To file the application for refund of ITC on account of Exports of Goods/Services- without Payment of Tax (accumulated ITC) (Excluding Electricity) on the GST Portal, perform following steps:
1. Access the https://www.gst.gov.in/ URL. The GST Home page is displayed.
2. Click the Services > Refunds > Application for Refund command.
3. The Select the refund type page is displayed.
4. Select the Exports of Goods/Services - without Payment of Tax (accumulated ITC) (Excluding Electricity) option.
5. Select the Tax Period for which application has to be filed from the drop-down list.
6. Click on the CREATE REFUND APPLICATION button.

Note 1:
a. Taxpayer must file the applicable return which were due to be furnished on or before the date on which the refund application is filed. If the return is not filed, an error message will be displayed on the screen. However, this will not be applicable for taxpayer type as ISD, NRTP OIDAR, TDS and TCS.
b. It is mandatory for the taxpayer to file latest GSTR-3B for the period for which refund has been filed or for the invoices for which a refund has been claimed. Even though GSTR-3B due date has not been expired. If GSTR-3B has not been filed then an error message will be displayed on the screen and taxpayer will not be allowed to file the refund application.

7. Select Yes if you want to file a nil refund. Or else, select No.
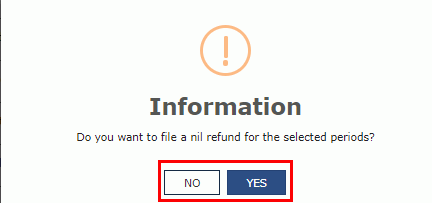
In case of Yes:
8. Select the Declaration checkbox.
9. In the Name of Authorized Signatory drop-down list, select the name of authorized signatory.
10. Click the FILE WITH DSC or FILE WITH EVC button.
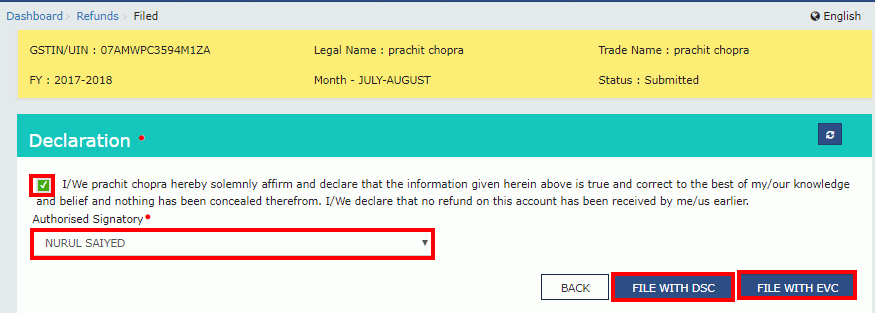
In Case of DSC:
a. Click the PROCEED button.
b. Select the certificate and click the SIGN button.
In Case of EVC:
a. Enter the OTP sent to email and mobile number of the Authorized Signatory registered at the GST Portal and click the VERIFY button.
In case of No:
8. The Exports of Goods/Services- without Payment of Tax (accumulated ITC) (Excluding Electricity) page is displayed.
First you need to download the offline utility, upload details of Exports of Goods and/or services and then file refund of ITC on account of Exports of Goods/Services - without Payment of Tax (accumulated ITC) (Excluding Electricity).

Note 1: A disclaimer will be displayed on the screen stating that System will not validate the period of limitation (relevant date) as specified in Section 54(1) of relevant GST acts and it is the responsibility of the taxpayer to ensure refund application is filed within two years from relevant date.
Note 2: A note will be displayed on the screen stating that Invoices uploaded in Statement-3 while filing this refund application will be locked and cannot be used in any subsequent refund application unless a deficiency memo is issued or the application is withdrawn.
Click the hyperlink below to know more about them.
For Statement 3: To download and enter details in Statement 3 for documents for which refund has to be claimed
For Annexure B: To download and enter details in Annexure B for Inward Supplies for which refund has to be claimed
Upload Details of Exports of goods and/ or services -
For Statement 3:To upload the JSON file with details of exports of good/ or services
For Annexure B: To upload the JSON file with details of Unutilised Inward Supplies
Refund of ITC on Export of Goods & Services without Payment of Tax - To enter details for refund of ITC on exports of good/ or services without payment of tax
For Statement 3:
9. Click the Download Offline Utility link.

10. Click the PROCEED button.
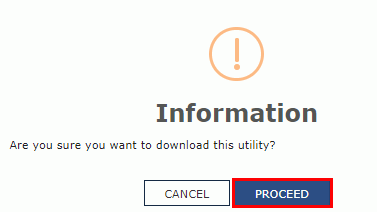
11. The zip file is downloaded. Right click on the zip file and select Extract All to unzip the downloaded file.

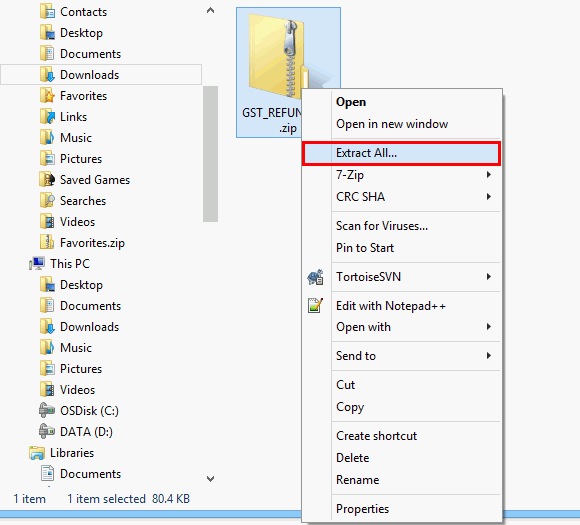
d. Statement 3 template would be downloaded. Open the excel sheet.
12. Once the template is downloaded, you need to enter the document details for which refund has to be claimed. Enter the GSTIN and “From Return Period” and “To Return Period” in mmyyyy format for which refund has to be claimed.

13. Enter the Sr. No., Document Details, Goods/ Services, Shipping bill/ Bill of export/ Endorsed Document no. details. The document type can be an invoice, a Debit note or a Credit note. Multiple Debit note or Credit note issued against invoices can also be entered in this statement.

Notes:
1. EGM details are mandatory in case of goods. BRC/FIRC details must be provided in case of services. You need to enter Unique BRC/FIRC details, as separate rows in Statement 3.
2. Port Code can be 6 digits alphanumeric only. Shipping Bill No can be 3 to 7 numeric digits.
3. EGM length can be between 1 to 20 characters.
4. BRC/FIRC length can be between 3 to 30 alphanumeric characters.
5. The date of BRC/ FIRC for export of services in the Statement 3 to be uploaded can be before/ on/ after the date of document.
6. One document can have multiple BRC/FIRC numbers. User can enter multiple BRC/FIRC numbers in Statement 3.
7. Document Date cannot be prior to 1st July 2017. Document date can be on or after 1stJuly 2017.
8. EGM date can be prior to 1st July 2017.
9. BRC/FIRC date can be prior to 1st July 2017.
10. Shipping Bill Number is mandatory, on selection of “Goods” option.
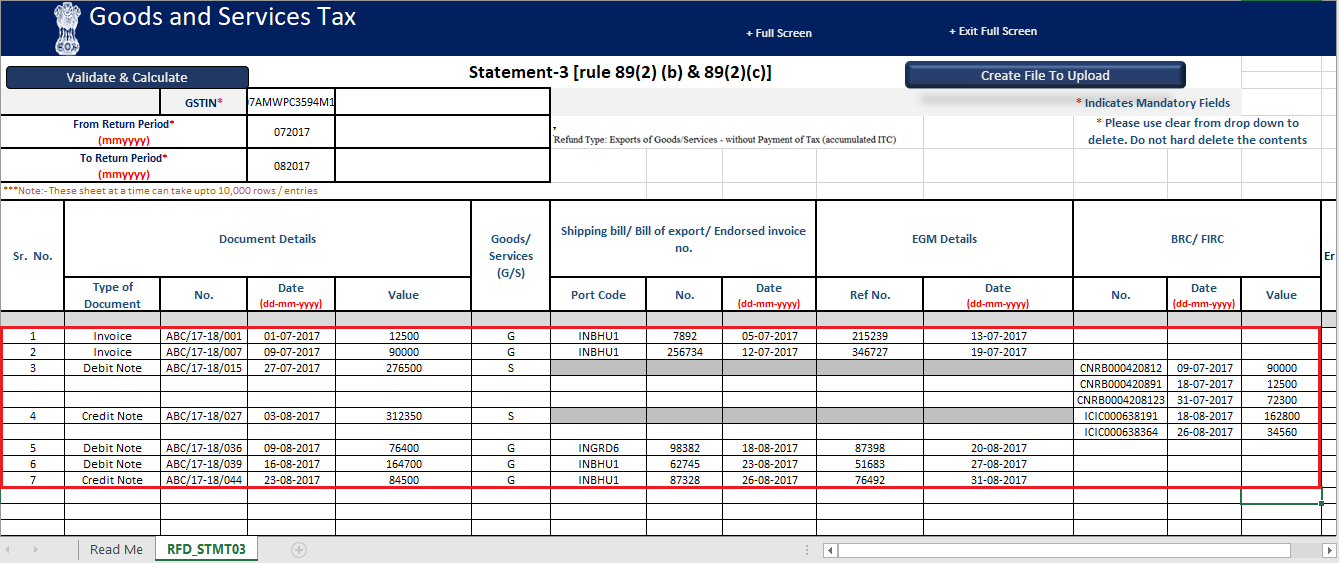
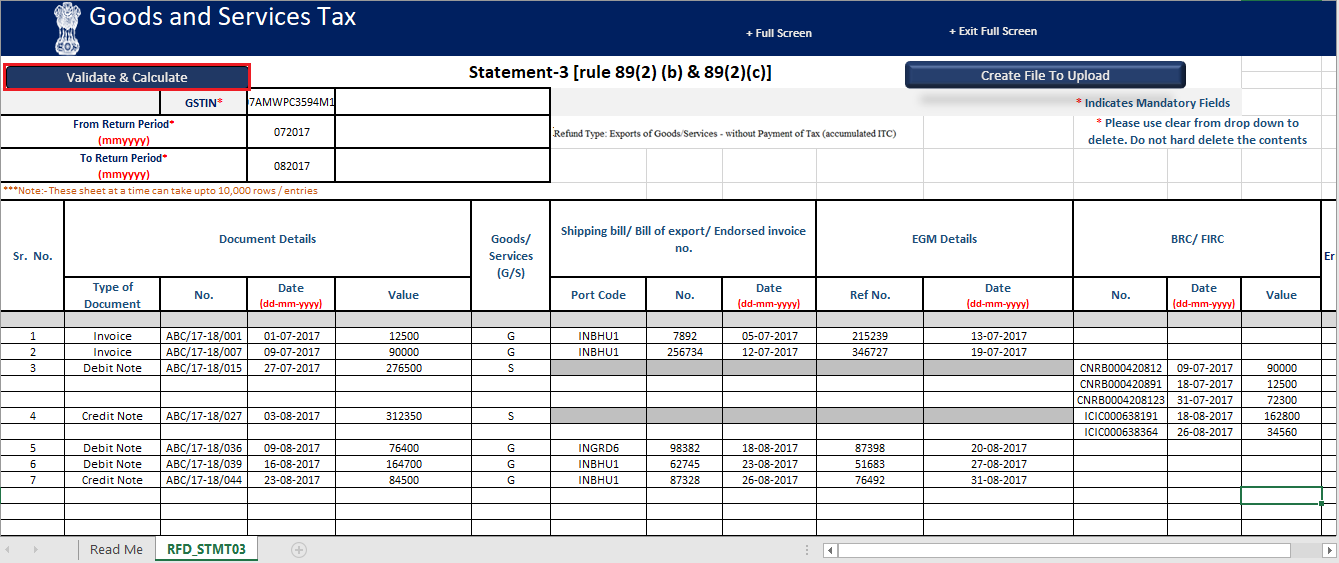
11. Click the Validate & Calculate button.
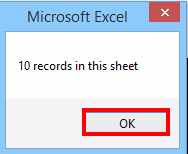
12. The total number of records in the sheet is displayed. Click the OK button.
In case of Error:
13.1. Error is displayed in the Error column. Rectify the error.
Note: Taxpayer will not receive an error message while he/she enters the same BRC/FIRC number against multiple invoices in a particular utility.
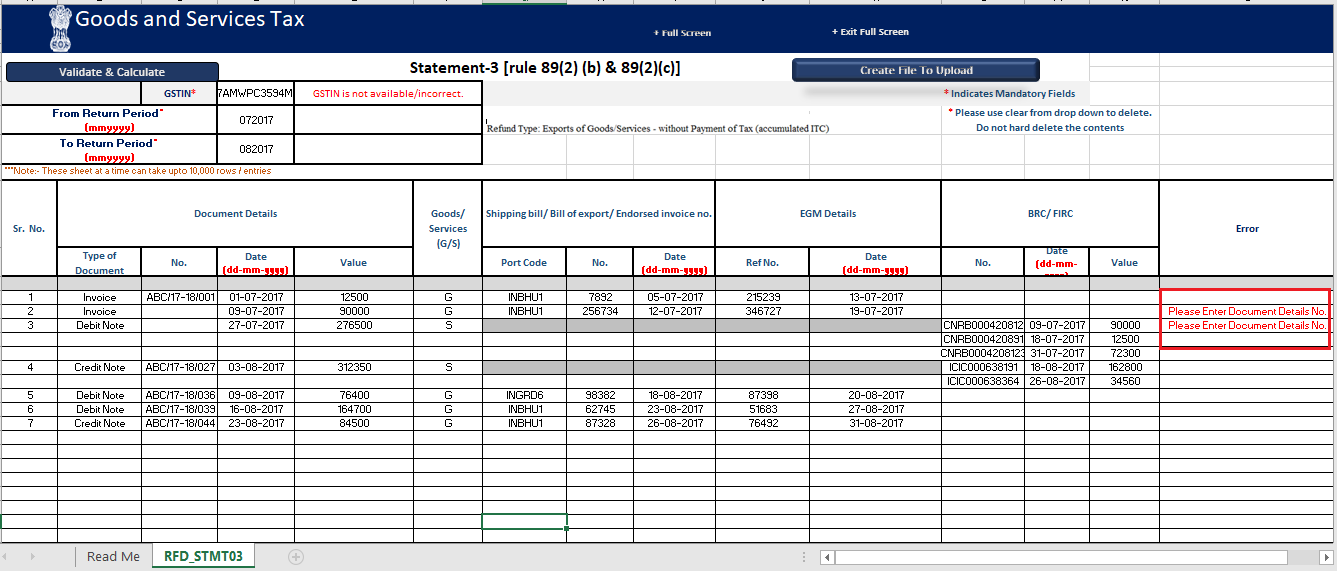
13.2. Click the Validate & Calculate button.
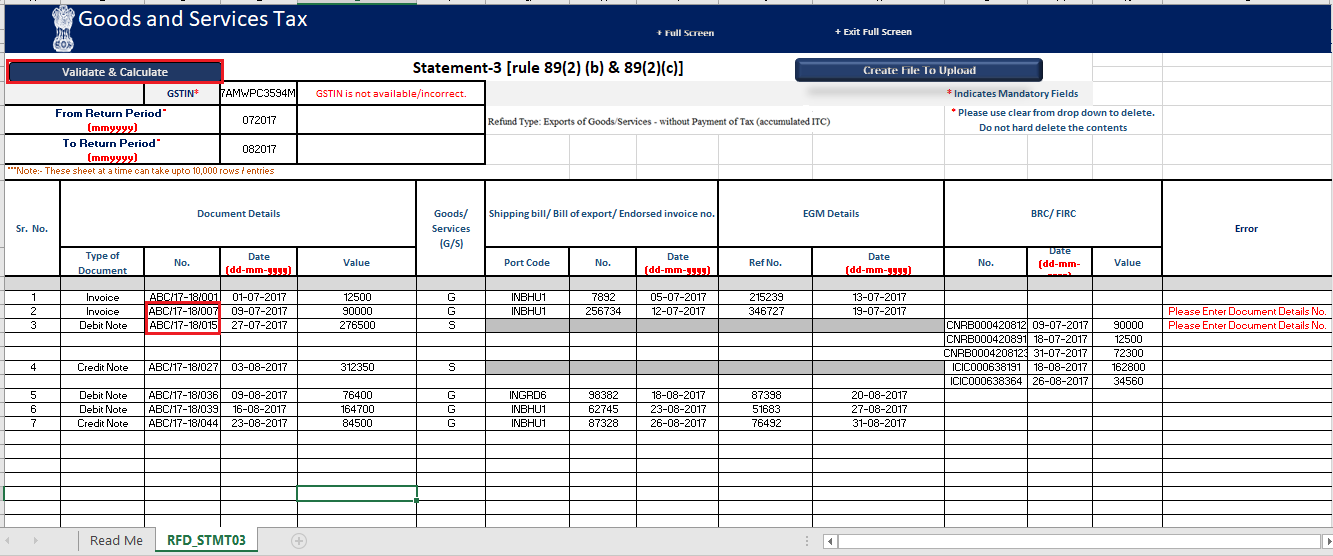
13.3. Notice that the Error column is blank now after rectification.
14. Click the Create File To Upload button.
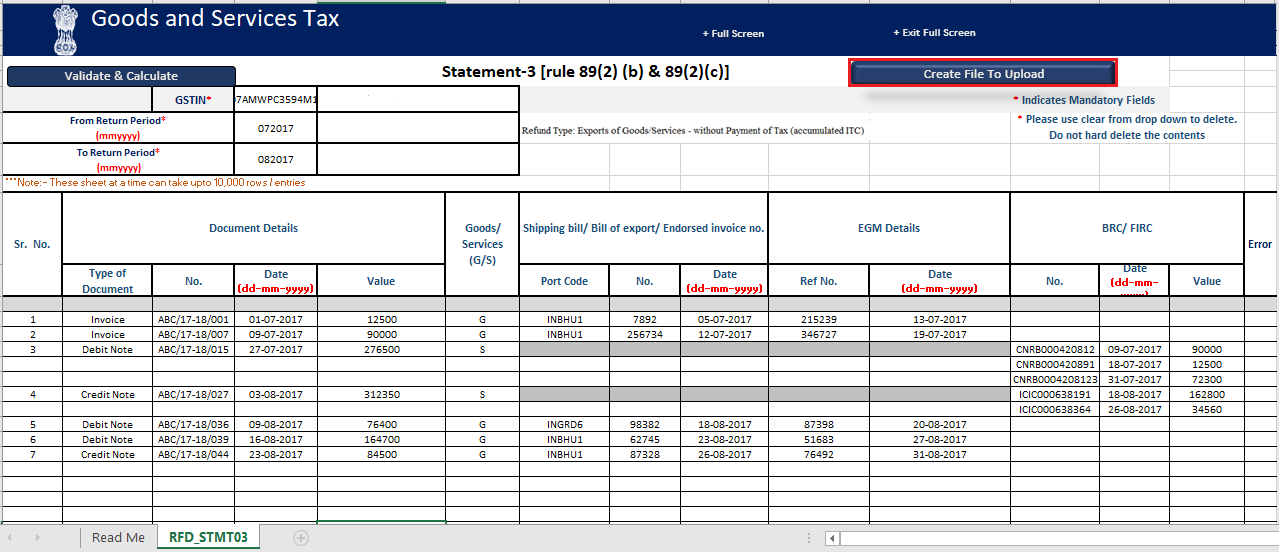
15. Browse the location where you want to save the file.
16. Enter the name of the file and click the SAVE button.

17. A success message is displayed that file is created and you can now proceed to upload the file on the GST Portal. Click the OK button.

For Annexure B:
9. Click on the Download Annexure B Offline Utility link.

10. Click on the PROCEED button.

11. Once you click on the Proceed button, a zip file will be downloaded. Right click on the zip file and select Extract All to unzip the downloaded file.


Open the excel sheet.

12. Once the template is downloaded, you can refer to the Read Me section for detailed instructions. The instruction contains all the steps to be followed while filing Annexure B and the validations that will be applied in the utility.

You need to enter the document details for which refund is to be claimed. Enter the GSTIN and From Return Period and To Return Period in mmyyyy format for which refund has to be claimed.

Note 1: The fields GSTIN, From return period, To return Period are mandatory fields. If taxpayer does not fill either of the details and then Click on the Validate and Calculate button, then the following error message will be displayed

Note 2: If the taxpayer does not enter a GSTIN or enters an incorrect GSTIN or enters a GSTIN in an improper format (including non-alphanumeric characters), and then clicks the Validate & Calculate button, the following error message will be displayed.

Note 3: If taxpayer enters future date in ‘From Return’ Period and Click on the Validate & Calculate button, then the following error message will be displayed.

Also, If taxpayer enters the From Return Period earlier than July'2017 and click on the Validate & Calculate button, then the following error message will be displayed.

Note 4: If taxpayer enters To return Period which is earlier than From Return Period and click on the Validate & Calculate button, then the following error message will be displayed.

Note 5: If taxpayer enters From Return Period in some invalid format and click on the Validate & Calculate button, then the following error message will be displayed.

Note 6: If taxpayer enters To Return Period in Invalid format and click on the Validate & Calculate button, then the following error message will be displayed.

Taxpayer can view two tables displayed within the document. Enter the required details in each table as specified below.
13. In the first table, Total ITC as per invoices mentioned in Utility (1) values are autopopulated based on the Invoice details mentioned the Utility. Enter the values for the below mentioned fields as declared in the GSTR-3B for the relevant refund period.
• Reversal as per rules 38,42 & 43 of CGST Rules and
• Section 17(5) (2), &
• Reversals - Others (3) rows.
The Net Input Tax Credit after reversals (1) − (2) − (3) will be automatically calculated based on the values entered in Row 1, 2 & 3.

Note 1: If taxpayer does not fill the details in Reversal as per rules 38,42 & 43 of CGST Rules and section 17(5) (2) and click on the Validate & Calculate button, then the following error message will be displayed.

Note 2: If taxpayer does not fill the details in Reversals - Others (3) and click on the Validate & Calculate button, then the following error message will be displayed.

14. In the second table, following fields will be displayed. The taxpayer shall enter all the required fields.


14.1 In Column 2 of the table, the taxpayer can select the Type of Inward Supply from the dropdown list. While copy-pasting the values, ensure that the exact options from the dropdown are used to avoid any errors.

If the taxpayer enters a value that does not match any of the options in the dropdown, the following error message will be displayed.

14.2 In Column 3 of the table, taxpayer can select the Type of Document from the following drop down. The document type can be an invoice/Bill of Entry, a Debit note or a Credit note.

While copy-pasting the values, ensure that the exact options from the dropdown are used to avoid any errors. If the taxpayer enters a value that does not match any of the options in the dropdown, the following error message will be displayed.

14.3 In Column 10, taxpayer can select the Category of Input Supplies from the following drop down. Three fields: Inputs, Input Services and a Capital Goods will be available in the drop-down.

While copy-pasting the values, ensure that the exact options from the dropdown are used to avoid errors. If the taxpayer enters a value that does not match any of the options in the dropdown, the following error message will be displayed.

14.4 Taxpayer can select the Whether ITC blocked under Section 17(5) from the following drop down and can select Yes, No or Partially.

While copy-pasting the values, ensure that the exact options from the dropdown are used to avoid errors. If the taxpayer enters a value that does not match any of the options in the dropdown, the following error message will be displayed.

14.5 In Column 18 of the table, the taxpayer can select the Eligible for ITC from the following drop down. It can be a Yes, No or Partially.

While copy-pasting the values, ensure that the exact options from the dropdown are used to avoid errors. If the taxpayer enters a value that does not match any of the options in the dropdown, the following error message will be displayed.

15. Click on the Validate & Calculate button.

Note: The Annexure B Offline Utility behaves as per the following conditions:
1.If the Type of Inward Supply is Import of Goods, Import of Services, or Inward Supplies liable to Reverse Charge (Unregistered Persons), the GSTIN of Supplier field will be auto-disabled, since these transactions do not require a supplier GSTIN.".

2. If the Type of Inward Supply is Import of Services, Import of Services (Supplies from SEZ to DTA), or Inward Supplies liable to Reverse Charge (Unregistered Persons), the 2B Return Period field will be auto-disabled, since these transactions do not form part of GSTR-2B.
3. Wherever the GSTIN of Supplier and 2B Return Period fields are auto-disabled, they are auto-populated as ‘NA’ i.e. Not applicable in both the Annexure B Offline Utility and the Valid/Invalid Invoices view.
4. Column 16 (Total Input Tax Credit) is a system-computed field that updates in real time, displaying the sum of IGST, CGST, SGST, and Cess for the respective invoice.

5. The Port Code field is mandatory only for Import of Goods and Import of Goods (Supplies from SEZ to DTA). In all other cases, this field remains disabled.

6. In Column 2, If any import-related supply type is selected, including supplies from SEZ to DTA, the CGST and SGST fields will be auto-disabled, since such transactions attract IGST only.

7. If Yes is selected for ITC blocked under Section 17(5), Column 18 is auto-filled as No and made non-editable, and Column 20 is auto-populated based on the Total ITC in Column 16.

8. The Document Value field is auto-disabled when the taxpayer selects Type of Inward Supply as Inward Supplies from ISD.

16. The total number of records in the sheet is displayed. Click on the OK button.

In case of Error:
16.1. Error is displayed in the Error column.
Column 1: Serial No.
While adding a new invoice If Sr. No. field is blank, then the following error message will be displayed.

If in Sr. No. column more than 15 characters are added or alphabets or decimal or Special characters are added, then the following error message will be displayed.

If in the Sr. No. field taxpayer has entered as zero, then the following error message will be displayed.

If the Sr. No. field is not entered in the sequence, then the following error message will be displayed.

Column 2: Type of Inward Supply
If the Type of Inward Supply is not selected, then the following error message will be displayed.

Column 3: Type of Document
If the Type of Document is not selected, then the following error message will be displayed.

If the Type of Inward Supply is selected as Import of Goods or Import of Goods (Supplies from SEZ to DTA) and the Document Type is selected as Credit Note or Debit Note, the following error message is displayed.

Column 4: GSTIN of the Supplier
While adding a new invoice If GSTIN of the Supplier field is blank, then the following error message will be displayed.

If GSTIN of the Supplier is incorrect or not entered in valid format (15-character format), then the following error message will be displayed.

Column 5: Name of Supplier
In case the Name of Supplier field is blank, then the following error message will be displayed.

If case the length for Name of Supplier exceeds 100 characters, then the following error message will be displayed.

Column 6: Document No./Bill of Entry No.
If Document No. field is blank, then the following error message will be displayed.

If the Type of Inward Supply is Import of Goods or Import of Goods (Supplies from SEZ to DTA) and the Bill of Entry field is left blank, the following error message is displayed:

If Value in Bill of Entry field in not entered in proper format (min 3 digits and max 7 digits) or entered with special characters, then the following error message will be displayed.

The Document No. column accepts a maximum of 16 characters (alphanumeric and special characters). If this limit is exceeded, the following error message will be displayed:

If the taxpayer enters a duplicate record with the same GSTIN, Invoice Number, Invoice Date, Category of Input Supplies, and HSN/SAC, the following error message will be displayed:

Column 7: Document Date
If Document Date is not entered, then the following error message will be displayed.

If Document Date is entered as future date, then the following error message will be displayed.

If Document Date is not entered in applicable format of dd-mm-yyyy , then the following error message will be displayed.

If a date earlier than 01-07-2017 is entered in the Document Date column, an error message will be displayed.

Column 8: Port Code
If Port Code is not entered, then the following error message will be displayed.

If Port Code is entered in incorrect format, then the following error message will be displayed.

Column 9: Document Value
If Document Value is not entered, then the following error message will be displayed.

If the Document Value exceeds 15 digits, contains more than 2 decimal places, or both, the following error message will be displayed.

Column 10: Category of Input Supplies
If the Category of Input Supplies is not selected, then the following error message will be displayed.

Column 11: HSN/SAC
In case the HSN/SAC field is blank, then the following error message will be displayed.

If HSN/SAC is entered in anything other than 4, 6, or 8 digits, then the following error message will be displayed.

Column 12: Central Tax
If the Central Tax Value exceeds 15 digits, contains more than 2 decimal places, or both, the following error message will be displayed.

Column 13: State Tax/Union Territory Tax
If the State Tax Value exceeds 15 digits, contains more than 2 decimal places, or both, the following error message will be displayed.

Column 14: Integrated Tax
If the Integrated Tax Value exceeds 15 digits, contains more than 2 decimal places, or both, the following error message will be displayed.

Column 15: Cess
If the Cess Value exceeds 15 digits, contains more than 2 decimal places, or both, the following error message will be displayed.

If the taxpayer is entering values under both the IGST and CGST & SGST heads, or entering values only under the CGST head while leaving the SGST head blank, then the following error message will be displayed.

Column 17: Whether ITC blocked under Section 17(5)
If no value is selected in Column 17 - Whether ITC blocked under Section 17(5), then the following error message will be displayed.

Row 18: Eligible for ITC
If Eligible for ITC is not selected, then the following error message will be displayed.

Column 19: Amount of Eligible ITC
If Amount of Eligible ITC is not entered, then the following error message will be displayed.

If the Amount of Eligible ITC contains more than 2 decimal places, the following error message will be displayed.

If the value entered as per column 19 and 20 is more than value as per column16 (Total Input Tax Credit) then the following error message will be displayed.

Column 20: Amount of Ineligible ITC
If Amount of Ineligible ITC is not entered, then the following error message will be displayed.

If the Amount of Ineligible ITC contains more than 2 decimal places, the following error message will be displayed.

If the value entered as per column 19 and 20 is more than value as per column16 (Total Input Tax Credit) then the following error message will be displayed.

Column 21: 2B Return Period
If 2B Return Period is not entered, then the following error message will be displayed.

If 2B Return Period is not entered in proper format, then the following error message will be displayed.

16.2. Rectify the error, the Error column will blank after rectification.

Click on the Validate & Calculate button.

16.3. Click on the Create File To Upload button.

17. Browse the location where you want to save the file. Enter the name of the file and click on the SAVE button.

17.1. A success message is displayed that file is created, and you can now proceed to upload the file on the GST Portal. Click on the OK button.

Note: If taxpayer does not enter any invoice details and Clicks on create file to upload button, then following error message will be displayed.

Upload Details of Exports of goods and/ or services
For Statement 3:
18. Click the link Click to upload the details of Exports of goods and/ or services.

19. Click the CLICK HERE TO UPLOAD button.
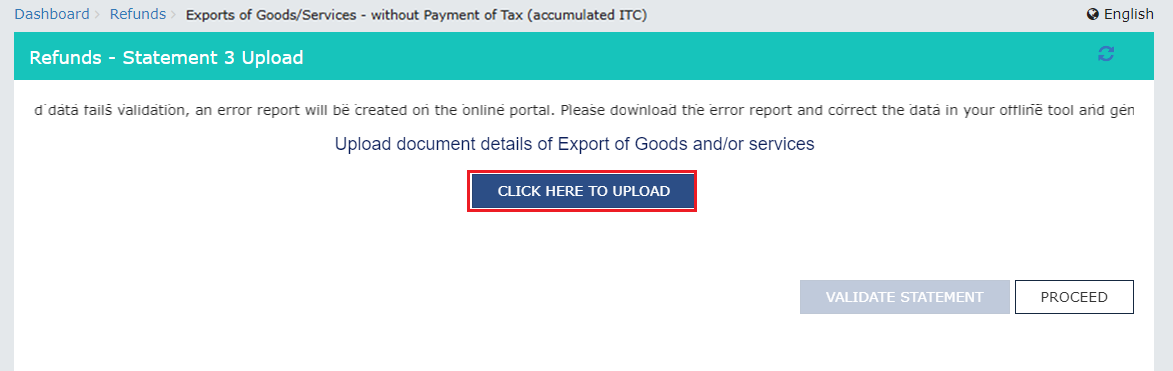
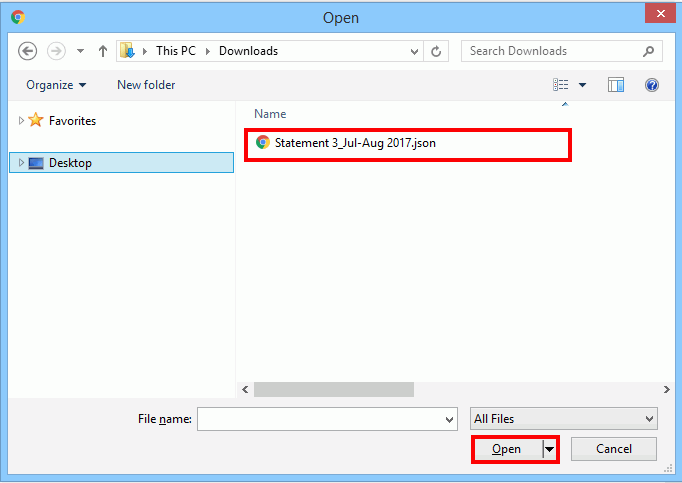
20. Browse the location where you saved the JSON file. Select the file and click the Open button.
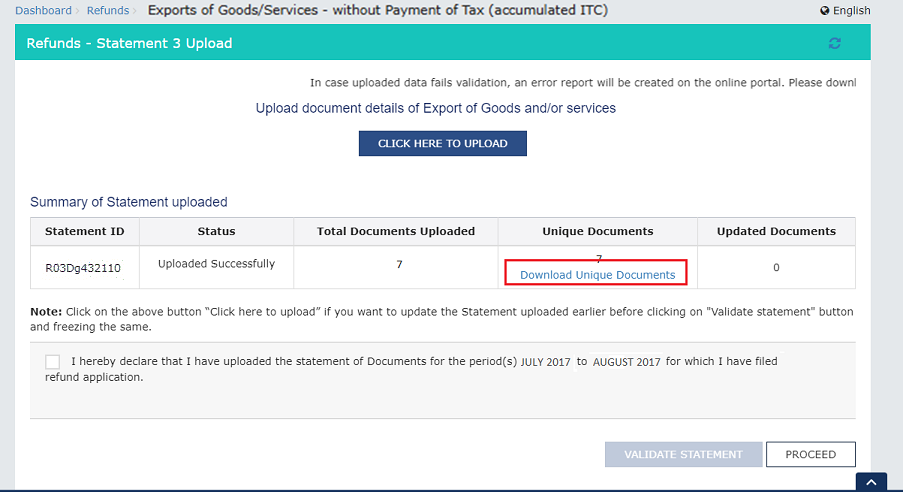
21.1. A success message is displayed that Statement has been uploaded successfully. You can click the Download Unique Documents link to view the documents that has been uploaded successfully.
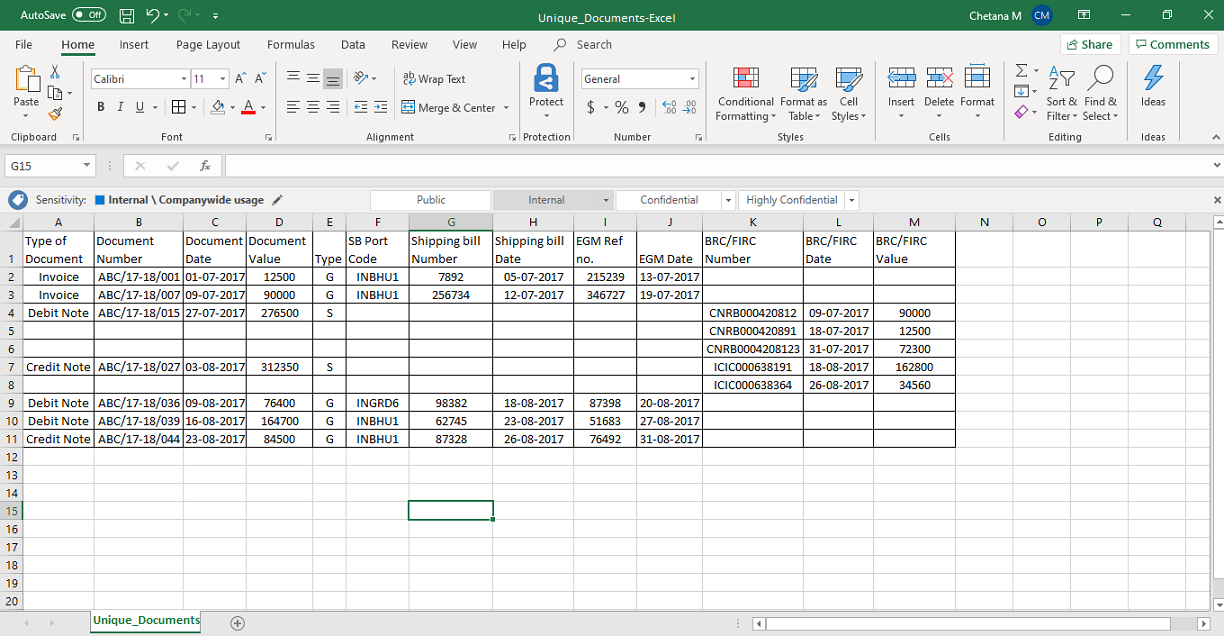
21.2. Unique documents that has been uploaded successfully are displayed.
22. Select the Declaration checkbox.
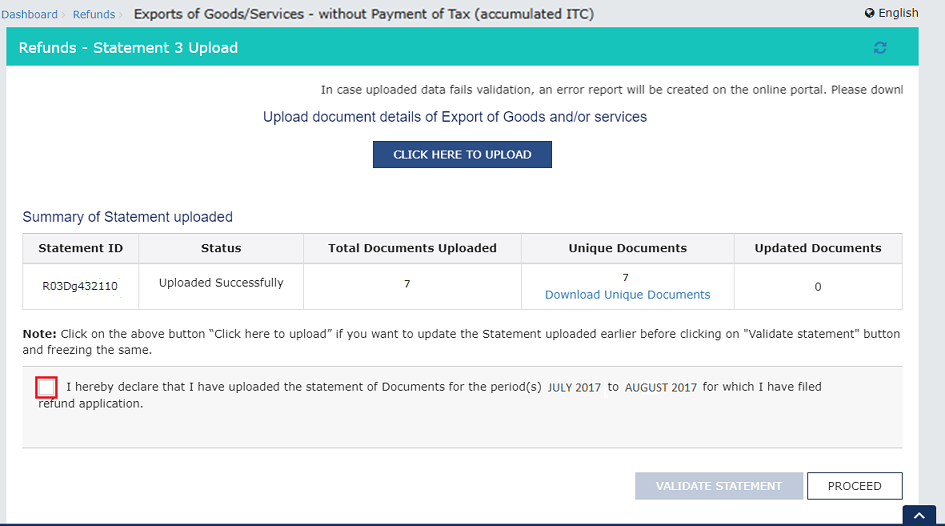
23. Click the PROCEED button.

24. Click the VALIDATE STATEMENT button.
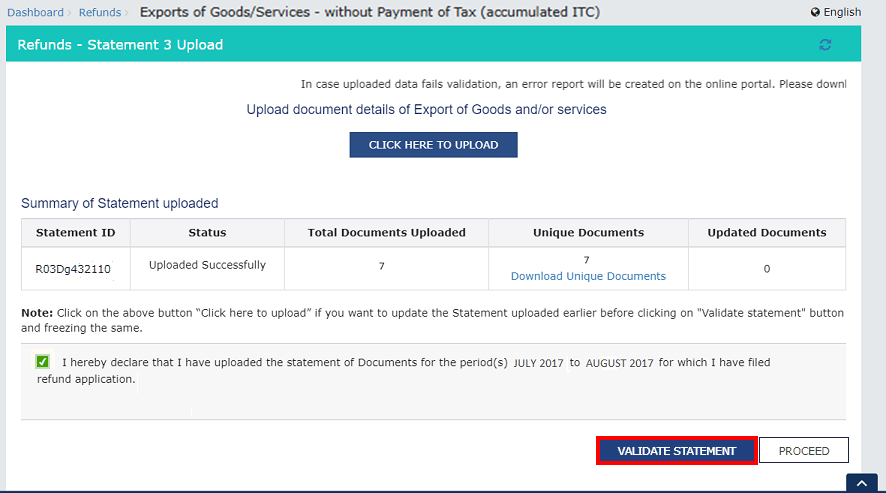
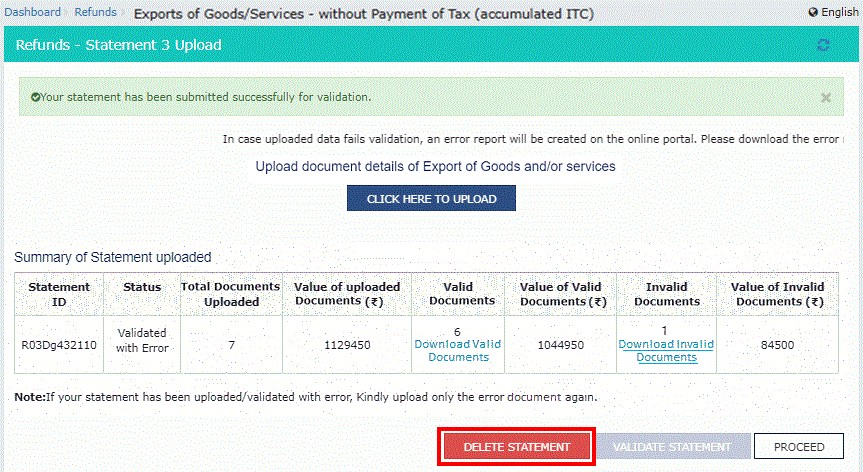
25.1. In case any statement is validated with error, click the Download Invalid Document link.

25.2 Invalid document excel sheet is downloaded on your machine. Open the invalid document excel sheet. Error details are displayed.
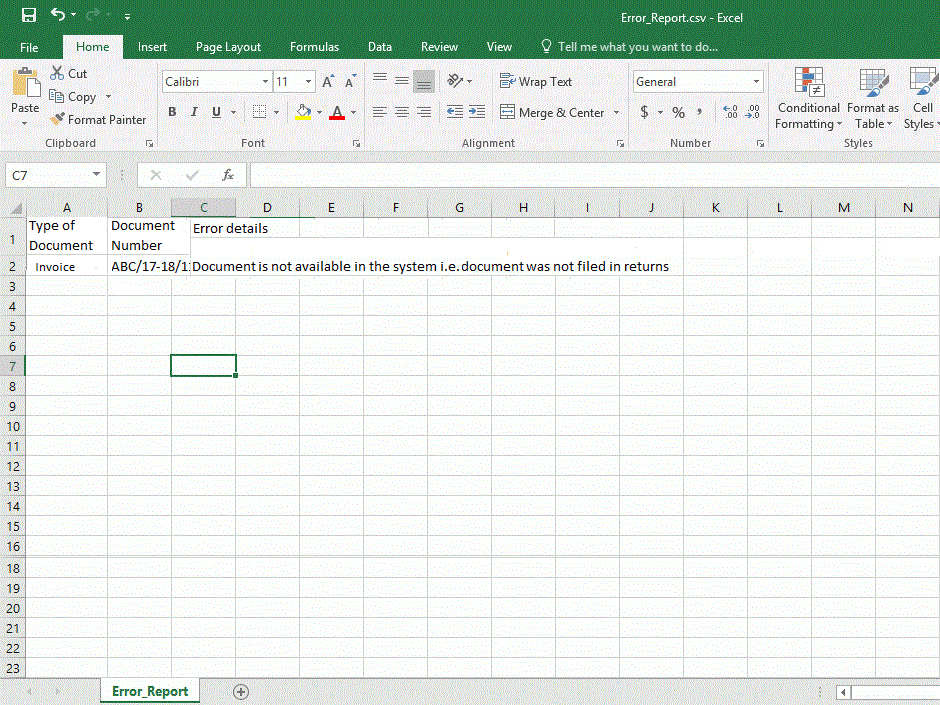
25.3 (a). If your statement has been uploaded/validated with error, rectify the error in the JSON file and upload these statements on the GST Portal again, as per process described above.
Note: You need to upload only the error documents again by clicking the CLICK HERE TO UPLOAD button.
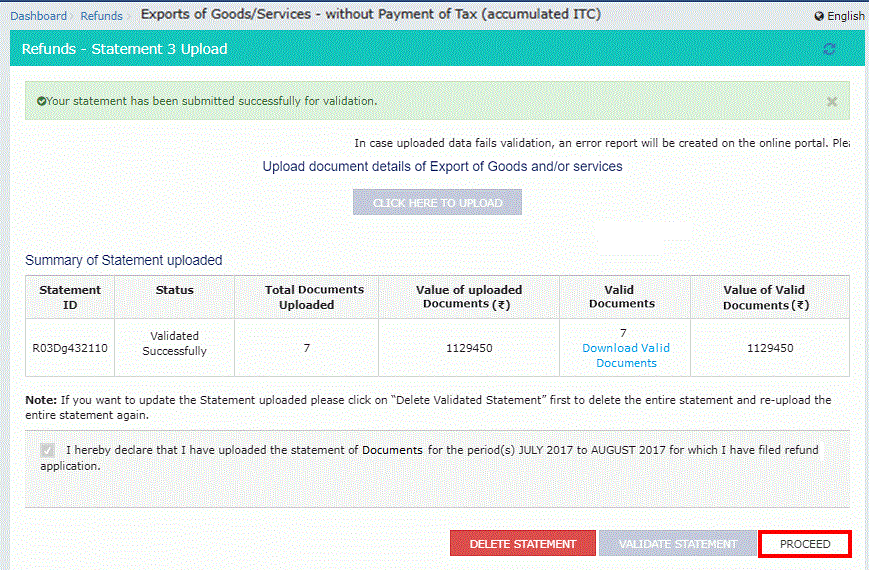
25.3 (b). If you don't have any error and statement has been validated, and then you want to update/delete the statement, then you would have to first delete the whole statement and upload a new statement of documents again if needed.
26. Once the statement is validated, you will get a confirmation message on screen that the statement has been submitted successfully for validation. Click the PROCEED button.
For Annexure B:
21. Click on the link Click to upload the Statement of invoices (Unutilized ITC).

22. Click on the CLICK HERE TO UPLOAD button.

On this screen, a running information message will be displayed along with the following note:
If your uploaded data fails validation, an error report will be available for download on the portal. Follow these steps:
1. Download the error report from the portal.
2. Open your offline tool and correct the errors mentioned in the report.
3. Generate a new JSON file.
4. Upload the new file on the portal.
Important: Upload the entire statement again. Uploading only the corrected portion will result in incomplete data.
Note 1: If GSTIN entered in the excel utility is not same as that of GSTIN as per system, then the following error message will be displayed.

Note 2: If return period entered in excel utility does not matches with the tax period for which refund application is to be filed, then the following screen will be displayed.

Note 3: The taxpayer is allowed to upload multiple JSON files. However, each file must have a unique file name. If the taxpayer attempts to upload a JSON file with a file name that has already been used previously, then the following error message will be displayed:

23. Browse the location where you saved the JSON file. Select the file and click on the Open button.

24. The following screen will be displayed. You can click on the Download Unique Documents link to view the documents that has been uploaded successfully.

25. Select the Declaration checkbox.

26. Click on the PROCEED button.

27. Click on the VALIDATE STATEMENT button.

28.1 In case any statement is validated without error, click on the Download valid Document link.

Note: A note is available on the screen showing the following message.
Please download and retain a copy of the validated invoices for your records, as the same will not be available for download after submission.

28.2 Valid document excel sheet is downloaded on your machine. Open the Valid document excel sheet.

In the validated document, a new column titled Whether Invoices included in GSTR 2B is introduced in addition to all existing columns of the offline utility. This column displays the validation status of each uploaded invoice with reference to the corresponding GSTR 2B period relevant to the invoice.
The system determines and auto populates the value of this column based on invoice-level comparison with GSTR 2B data for the applicable period. The column reflects one of the following values:
| Sr.No | Values | Remarks |
| 1 | Yes | Where the invoice furnished in the utility is available in the corresponding GSTR 2B period and all prescribed parameters match successfully. |
| 2 | No | Where the invoice furnished in the utility is not available in the corresponding GSTR 2B period. |
| 3 | This invoice pertains to a period on or before Oct 2024 and has not been validated against GSTR-2B by the system. | Where the invoice relates to a tax period up to October 2024. Such invoices shall be excluded from system-based validation against GSTR 2B. |
| 4 | Unregistered RCM & Import of services do not form a part of 2B. Hence, not available. |
Applicable for the following categories of inward supplies: Since these transactions do not form part of GSTR 2B, no validation shall be performed, and the above remark shall be displayed. |
28.3 (a). Once your statement has been validated without errors, it cannot be edited directly. To make any changes, click the DELETE STATEMENT button to delete the entire statement, then upload a new statement with the corrected documents if required.

28.3 (b). The following pop-up will be displayed. Click on the PROCEED button.

28.3 (c). A success message will be displayed.

28.4. In case any statement is validated with error, click on the Download Invalid Document link.

The following notes are available on the screen showing the following message.
Note: If your statement has been uploaded/validated with error, kindly upload only the error document again.
Note: The following documents will be treated as valid:
1. Invoices for the period November 2024 onwards that have been successfully validated.
2. Invoices not found in GSTR-2B, shown with status "NO" in the column "Whether Invoice is included in GSTR-2B."
3. Import of services and unregistered supply invoices that could not be validated because the required data is not available in GSTR-2B.
4. Invoices for the period up to October 2024, which are not validated against GSTR-2B by the system.
Note: Invalid documents are invoices that exist in GSTR-2B, but where the details you entered do not match the data available in GSTR-2B.
28.5 Once Invalid document excel sheet is downloaded. Open the invalid document excel sheet. Error details are displayed.

28.6 (a). If your statement has been validated with error, rectify the error in the JSON file and upload these statements on the GST Portal again, as per process described above.
Note: You need to upload only the error documents again by clicking on the CLICK HERE TO UPLOAD button.
29. Once the statement is validated, you will get a confirmation message on screen that the statement has been submitted successfully for validation. Click on the PROCEED button.

On clicking the PROCEED button, an information icon containing a summary of all invoices and reversal amounts reported across the uploaded JSON files is displayed. Additionally, a message displaying the number of invoices not found in GSTR-2B will be shown for the taxpayer’s information. Click on the PROCEED button.

Refund of ITC on Export of Goods & Services without Payment of Tax
27. In the Table-1: Computation of Refund to be claimed Statement-3A [rule 89(4)]: -
a. In Column (1) of Turnover of zero rated supply of goods and services (1) (₹), enter the aggregate turnover of zero rated supply of goods and services i.e. Integrated Tax, Central Tax, State/ UT Tax and Cess.
b. In Column (2) of Adjusted total turnover (2) (₹), enter the aggregate adjusted total turnover i.e. Integrated Tax, Central Tax, State/ UT Tax and Cess.
c. In Column (3) of Net input tax credit (3) (₹), the Net ITC in table “Computation of Refund to be claimed” is auto-populated by the system and can be edited downwards.
d. After filling the appropriate figures in the table (Statement 3A), the amount of refund will get auto populated in the column (4) “Maximum refund amount to be claimed”.

28. In the Table-2: Calculation of Refundable Amount as per Circular No. 125/44/2019-GST: -
a. Column (1) – Balance in Electronic Credit Ledger at the end of the tax period for which refund is claimed (₹): This column shows the head-wise balance available in your Electronic Credit Ledger at the end of the tax period for which you are claiming the refund. The balance is captured after the return (GSTR-3B) for that tax period has been filed.
b. Column (2) – Balance in Electronic Credit Ledger at the time of filing the refund application (₹): This column shows the head-wise balance available in your Electronic Credit Ledger at the time you file the refund application. This balance may differ from Column (1) if credits have been utilised or added after the return was filed.
c. Column (3) – Maximum refund amount as calculated in Column 4 of Table 1 (₹): This column shows the maximum refund amount calculated by the system using the formula in 'Computation of Refund to be Claimed (Statement 1) – Column 4'. It is displayed here for reference, and the system also uses it to determine the final refundable amount.

d. Column (4) – Refundable Amount as per Circular No. 125/44/2019-GST (₹): This column shows the final refundable amount as determined by the system in accordance with Circular No. 125/44/2019-GST. An information icon (ℹ) is provided in this column. On hovering over the icon, the following information is displayed

29. In the Table 3: Amount Eligible for Refund (in ₹): -
a. Column (1) – Balance in Electronic Credit Ledger at the time of filing the refund application (₹): This column displays the head-wise balance available in your Electronic Credit Ledger at the time of filing the refund application.
b. Column (2) – Refundable Amount as per Circular No. 125/44/2019-GST, as calculated in Column 4 of Table 2 (₹): This column displays the same amount as calculated in Column 4 of Table 2 ("Calculation of Refundable Amount as per Circular No. 125/44/2019-GST").

c. Column (3) – Eligible Refund Amount (₹): This column displays the final eligible refund amount admissible to the taxpayer. The amount is calculated by the system and cannot be edited. An information icon (ℹ) is provided in this column. On hovering over the icon, the following message is displayed:

System Validations and Auto-Population Logic for Refund Claim Amount (Column 3 of Table 3)
The following validations and system logic, as per Circular No. 125/44/2019-GST, are applied while calculating the refund claim amount under each head in Column 3:
i. Auto-Population Logic
a. The refund amount is first adjusted against the Integrated Tax (IGST) head, subject to the available balance under IGST as per Column 1 (i.e., the Electronic Credit Ledger balance at the time of filing the refund application).
b. If any amount remains after adjustment against IGST, the balance is allocated equally between the Central Tax (CGST) and State/Union Territory Tax (SGST/UTGST) heads, subject to the available balance under each head.
c. If the balance under either CGST or SGST/UTGST is insufficient, the shortfall is adjusted against the Other head, to the extent of the balance available in that head.
d. The refund amount under the Cess head is adjusted exclusively against the available Cess balance in the Electronic Credit Ledger.
ii. System-Generated Values in Column 3
a. The values auto-populated in Column 3 are calculated strictly as per the above logic and system validations.
b. The auto-populated amounts are non-editable for all tax heads (IGST, CGST, SGST/UTGST, and Cess).
Case 1: When sufficient balance is available under IGST head
| Act | Balance in Electronic Credit Ledger at the time of filing of refund application (1) (₹) | Refundable Amount as per Circular 125/44/2019 as calculated in Column 4 of Table 2 above (2) (₹) |
Eligible Refund Amount (3) (₹) |
| IGST | 4500 | 4200 | 4200 |
| CGST | 300 | 0 | |
| SGST/UT | 1500 | 0 | |
| Total Tax | 6300 | 4200 | 4200 |
| Cess | 400 | 120 | 120 |
| Total Cess | 400 | 120 | 120 |
In the above scenario:
• Since sufficient balance is available under the Integrated Tax (IGST) head in the Electronic Credit Ledger, the entire refund amount pertaining to IGST, CGST, and SGST/UTGST is debited from the IGST head itself.
• The refund amount under the Cess head is auto populated up to the available balance. In this case, ₹120 is auto populated and fully debited from the Cess balance in the Electronic Credit Ledger, as reflected in Column 3.
Case 2: When sufficient balance is not available under the IGST head, the remaining refund amount is adjusted equally from the CGST and SGST/UTGST heads, subject to the availability of balance under each head.
| Act | Balance in Electronic Credit Ledger at the time of filing of refund application (1) (₹) | Refundable Amount as per Circular 125/44/2019 as calculated in Column 4 of Table 2 above (2) (₹) |
Eligible Refund Amount (3) (₹) |
| IGST | 2000 | 4200 | 2000 |
| CGST | 1500 | 1100 | |
| SGST/UT | 1500 | 1100 | |
| Total Tax | 5000 | 4200 | 4200 |
| Cess | 400 | 120 | 120 |
| Total Cess | 400 | 1300 | 1300 |
In this scenario:
• The refund amount is first adjusted against the available balance under the Integrated Tax (IGST) head. Since the available IGST balance is ₹2,000, which is lower than the total refund amount of ₹4,200, the system debits the IGST head up to the available balance. Accordingly, ₹2,000 is auto populated under the IGST head in Column 3.
• The remaining refund amount of ₹2,200 is then allocated equally between the Central Tax (CGST) and State Tax (SGST) heads. Accordingly, ₹1,100 is auto populated under CGST and ₹1,100 under SGST in Column 3.
• The refund amount under the Cess head is auto populated up to the available balance. In this case, ₹120 is auto populated and debited from the Cess balance in the Electronic Credit Ledger, as reflected in Column 3.
Case 3: Where sufficient balance is not available under the IGST head and no balance is available under the SGST head, while adequate balance exists under the CGST head, the system shall utilise the available balance in the CGST head to meet the required debit.
| Act | Balance in Electronic Credit Ledger at the time of filing of refund application (1) (₹) | Refundable Amount as per Circular 125/44/2019 as calculated in Column 4 of Table 2 above (2) (₹) |
Eligible Refund Amount (3) (₹) |
| IGST | 2000 | 4200 | 2000 |
| CGST | 3000 | 2200 | |
| SGST/UT | 0 | 0 | |
| Total Tax | 6300 | 4200 | 4200 |
| Cess | 400 | 120 | 120 |
| Total Cess | 400 | 120 | 120 |
In the above scenario:
• As the balance available under the IGST head is insufficient, the system first utilizes the available IGST credit. Accordingly, ₹2,000 is debited from the IGST head against the total refund claim of ₹4,200.
• The remaining refund amount of ₹2,200 is auto-populated from the CGST head, since no balance is available under the SGST/UTGST head and sufficient balance exists under the CGST head.
• The refund amount under the Cess head is auto-populated up to the available balance. In this case, ₹120 is debited from the Cess balance in the Electronic Credit Ledger.
• The auto-populated refund amounts are debited from the respective heads of the Electronic Credit Ledger, as reflected in Column (3).
Case 4: Where sufficient balance is not available under the IGST head, and the balance available under the CGST head is also insufficient to meet the requirement of equal debit, the system shall utilise the available balance under the SGST head to the extent of the shortfall, provided sufficient balance exists under the SGST head.
| Act | Balance in Electronic Credit Ledger at the time of filing of refund application (1) (₹) | Refundable Amount as per Circular 125/44/2019 as calculated in Column 4 of Table 2 above (2) (₹) |
Eligible Refund Amount (3) (₹) |
| IGST | 2000 | 4200 | 2000 |
| CGST | 700 | 700 | |
| SGST/UT | 2000 | 1500 | |
| Total Tax | 6300 | 4200 | 4200 |
| Cess | 400 | 120 | 120 |
| Total Cess | 400 | 120 | 120 |
The In the above scenario:
• Since the available balance under the IGST head is insufficient, the system first utilizes the IGST credit to the extent available. Accordingly, ₹2,000 is debited from the IGST head against the total refund claim of ₹4,200.
• The remaining refund amount of ₹2,200 is then apportioned between the CGST and SGST/UTGST heads. The system auto-populates the refund amount from both heads based on availability of balance.
• In this case, ₹700 is debited from the CGST head (entire available balance), and the remaining ₹1,500 is debited from the SGST/UTGST head.
Thus, where sufficient balance is not available in one head, the system adjusts the available balance from that head and draws the remaining amount from the other head.
• The refund amount under the Cess head is auto-populated up to the available balance. Here, ₹120 is debited from the Cess balance in the Electronic Credit Ledger.
• The auto-populated refund amounts are debited from the respective heads of the Electronic Credit Ledger, as reflected in Column (3).
Case 5: When no balance is available under the IGST head and equal amounts of balance are available under both the CGST and SGST heads as required for the debit, the system shall utilise the balances under the CGST and SGST heads accordingly to discharge the liability.
| Act | Balance in Electronic Credit Ledger at the time of filing of refund application (1) (₹) | Refundable Amount as per Circular 125/44/2019 as calculated in Column 4 of Table 2 above (2) (₹) |
Eligible Refund Amount (3) (₹) |
| IGST | 0 | 4200 | 0 |
| CGST | 2200 | 2100 | |
| SGST/UT | 3000 | 2100 | |
| Total Tax | 5200 | 4200 | 4200 |
| Cess | 400 | 120 | 120 |
| Total Cess | 400 | 120 | 120 |
In the above scenario:
• Since no balance is available under the IGST head, no amount is debited from IGST towards the refund claim.
• The total refund amount of ₹4,200 is therefore apportioned between the CGST and SGST/UTGST heads. The system auto-populates the refund equally between both heads, subject to availability of balance.
• In this case, ₹2,100 is debited from the CGST head and ₹2,100 is debited from the SGST/UTGST head.
• Where sufficient balance is not available in one head, the system adjusts the available balance from that head and allocates the remaining amount from the other head.
• The refund amount under the Cess head is auto-populated up to the available balance. Here, ₹120 is debited from the Cess balance in the Electronic Credit Ledger.
• The auto-populated refund amounts are debited from the respective heads of the Electronic Credit Ledger, as reflected in Column (3).
30. You can click the hyperlink Click to view Electronic Liability Ledger to view details of Electronic Liability Ledger that displays your liabilities/ dues of Returns and other than Returns.

Note: When the refund amount claimed is ₹50 crore or more, an additional field appears on the RFD‑01 page, and the taxpayer is required to enter the Legal Entity Identifier (LEI) number.

If the taxpayer attempts to submit the RFD‑01 application without entering the LEI number for a refund claim of ₹50 crore or more, an error is displayed on the screen.

The taxpayer must enter exactly 20 alphanumeric characters in the LEI field. The taxpayer shall enter the correct LEI number, in case there is any discrepancy in LEI number, the system will display the following error.

The taxpayer is required to manually enter the LEI details in two separate fields. Please note that copy pasting of LEI number is not allowed to ensure correct data entry.

If both the entered values match, the taxpayer can proceed further. If the values do not match, the following error is displayed until the correct LEI is entered.

Note 1: LEI related provisions is not applicable to GSTINs registered under the following business constitutions: Government Department, Local Authority, Statutory Body/Government Agency, Statutory Body, Society established by Central/State Government or Local Authority, and any authority, board, or body notified by the Central or State Government.
Note 2: The taxpayer can view the entered LEI number in generated PDF also.

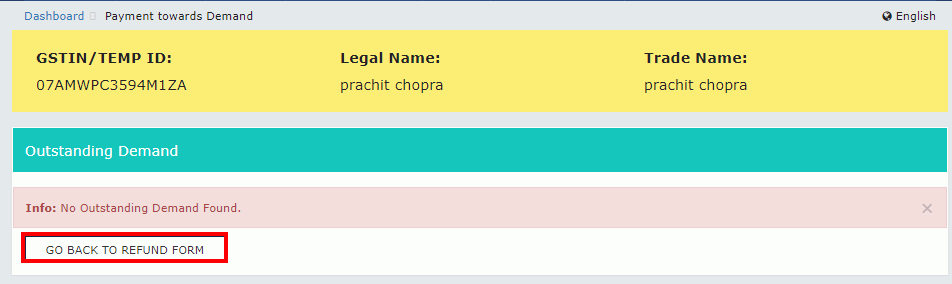
31. Click the GO BACK TO REFUND FORM to return to the refund application page.
32. Select the Bank Account Number from the drop-down list.

33. Under section upload Supporting Documents, you can upload supporting documents (if any).

34. Click the Delete button, in case you want to delete any document.

Note: For detailed tips on the supporting documents uploading process, click on the hyperlink below.

Upon clicking the hyperlink, a new document is opened in PDF format.


35. In case you have filed the bond/ undertaking (Form GST RFD-11), select Yes. In case of Yes, enter the Reference Number of RFD-11 filing.

36. In case you have a valid LUT number, enter the Reference Number for RFD-11 filing.

Note:
a. If the taxpayer enters a LUT number with fewer than 15 digits and clicks the Save button, following error is displayed on the screen.

b. If the entered LUT number is not linked to the GSTIN, following error is displayed.

c. If the taxpayer does not enter the LUT Reference Number and clicks Save, following error is displayed.

The taxpayer can view the LUT status as on the date of filing of the refund application, along with the relevant financial year, displayed below the LUT field.

37. After adding all the details, click on the SAVE button.

Note: To view your saved application, navigate to Services > Refunds > My Saved/Filed Application command.
Application can be saved at any stage of completion for a maximum time period of 15 days. If the same is not filed within 15 days, the saved draft will be purged from the GST database.
38. Click the PREVIEW button to download the form in PDF format.

39. Form is downloaded in the PDF format.

40. Select the Declaration, Undertaking and Self-Declaration checkbox.
41. Click the SUBMIT button.

Note: On clicking the SUBMIT button, In case of a mismatch i.e., where the total tax amount in Annexure B is either less than or greater than the refund amount claimed, then the following warning message will be displayed. Click OKAY.

42. Click the PROCEED button.

43. Select the Declaration checkbox.
44. In the Name of Authorized Signatory drop-down list, select the name of authorized signatory.
45. Click the FILE WITH DSC or FILE WITH EVC button.
In Case of DSC:
a. Click the PROCEED button.
b. Select the certificate and click the SIGN button.
In Case of EVC:
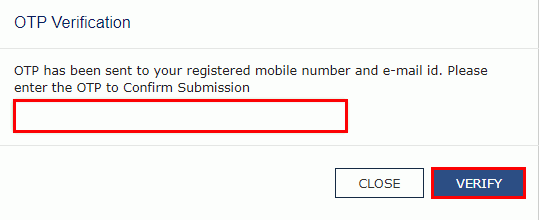
a. Enter the OTP sent to email and mobile number of the Authorized Signatory registered at the GST Portal and click the VERIFY button.
46. The success message is displayed and status is changed to Submitted. Application Reference Number (ARN) receipt is downloaded and also sent on your e-mail address and mobile phone number. Click the PDF to open the receipt.
Notes:
The system generates an ARN and displays it in a confirmation message, indicating that the refund application has been successfully filed.
GST Portal sends the ARN to registered e-mail ID and mobile number of the registered taxpayer.
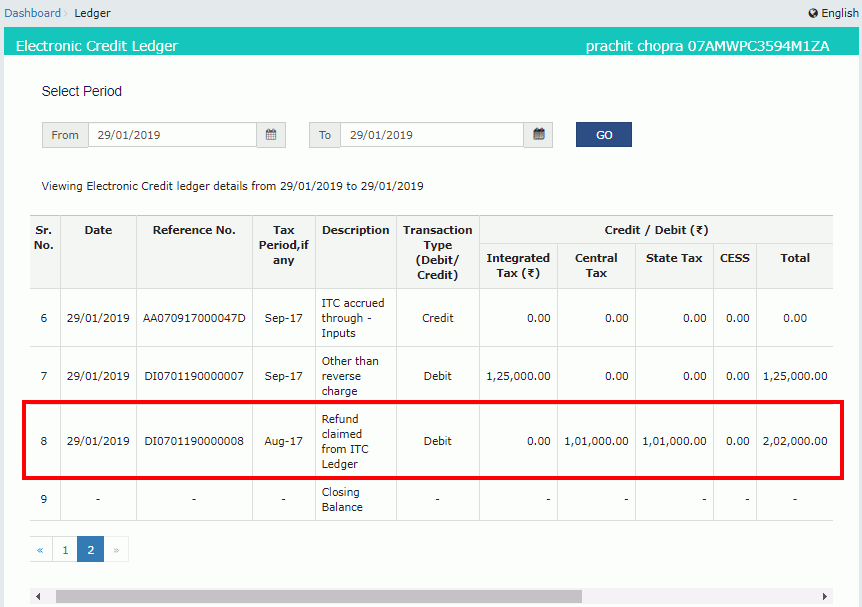
GST Portal also makes a Debit entry in the Electronic Credit Ledger for the amount claimed as refund.
Filed applications (ARNs) can be downloaded as PDF documents using the My Saved / Filed Applications option under Refunds.
Filed applications can be tracked using the Track Application Status option under Refunds.
Once the ARN is generated on filing of form RFD-01, refund application shall be assigned to refund processing officer for processing. The application will be processed and refund status shall be updated.
The disbursement is made once the concerned Tax Official processes the refund application.

47. ARN receipt is displayed.

48. Navigate to Services > Ledgers > Electronic Credit Ledger to view the debit entry in the Electronic Credit Ledger for the amount claimed as refund.

49. The Electronic Credit Ledger is displayed. Click the Electronic Credit Ledger link.

50. Select the From and To date using the calendar to select the period for which you want to view the transactions of Electronic Credit Ledger.
51. Click the GO button.

52. The Electronic Credit Ledger details are displayed. Notice the debit entry in the Electronic Credit Ledger for the amount claimed as refund.