To file the application for refund on account of Export of Services- with Payment of Tax on the GST Portal, perform the following steps:
1. Access the GST Portal. The GST Home page is displayed.
2. Click the Services > Refunds > Application for Refund command.
3. The Select the refund type page is displayed.
4. Select the Export of Services-with Payment of Tax option.
5. Click the CREATE REFUND APPLICATION button.

Note:
a. Taxpayer must file the applicable return which were due to be furnished on or before the date on which the refund application is filed. If the return is not filed, an error message will be displayed on the screen.
b. It is mandatory for the taxpayer to file latest GSTR-3B for the period for which refund has been filed or for the invoices for which a refund has been claimed. Even though GSTR-3B due date has not been expired. If GSTR-3B has not been filed then an error message will be displayed on the screen and taxpayer will not be allowed to file the refund application.

7 (a). Select Yes if you want to file a nil refund. Or else, select No.
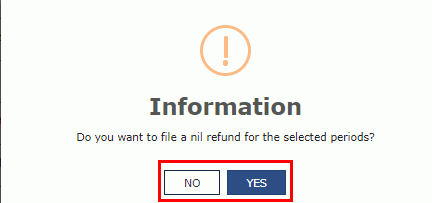
In case of Yes:
8. Select the Declaration checkbox.
9. In the Name of Authorized Signatory drop-down list, select the name of authorized signatory.
10. Click the FILE WITH DSC or FILE WITH EVC button.

In Case of DSC:
a. Click the PROCEED button.
b. Select the certificate and click the SIGN button.
In Case of EVC:
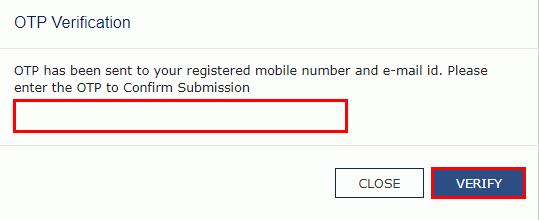
a. Enter the OTP sent to email and mobile number of the Authorized Signatory registered at the GST Portal and click the VERIFY button.
7 (b). In case of No:
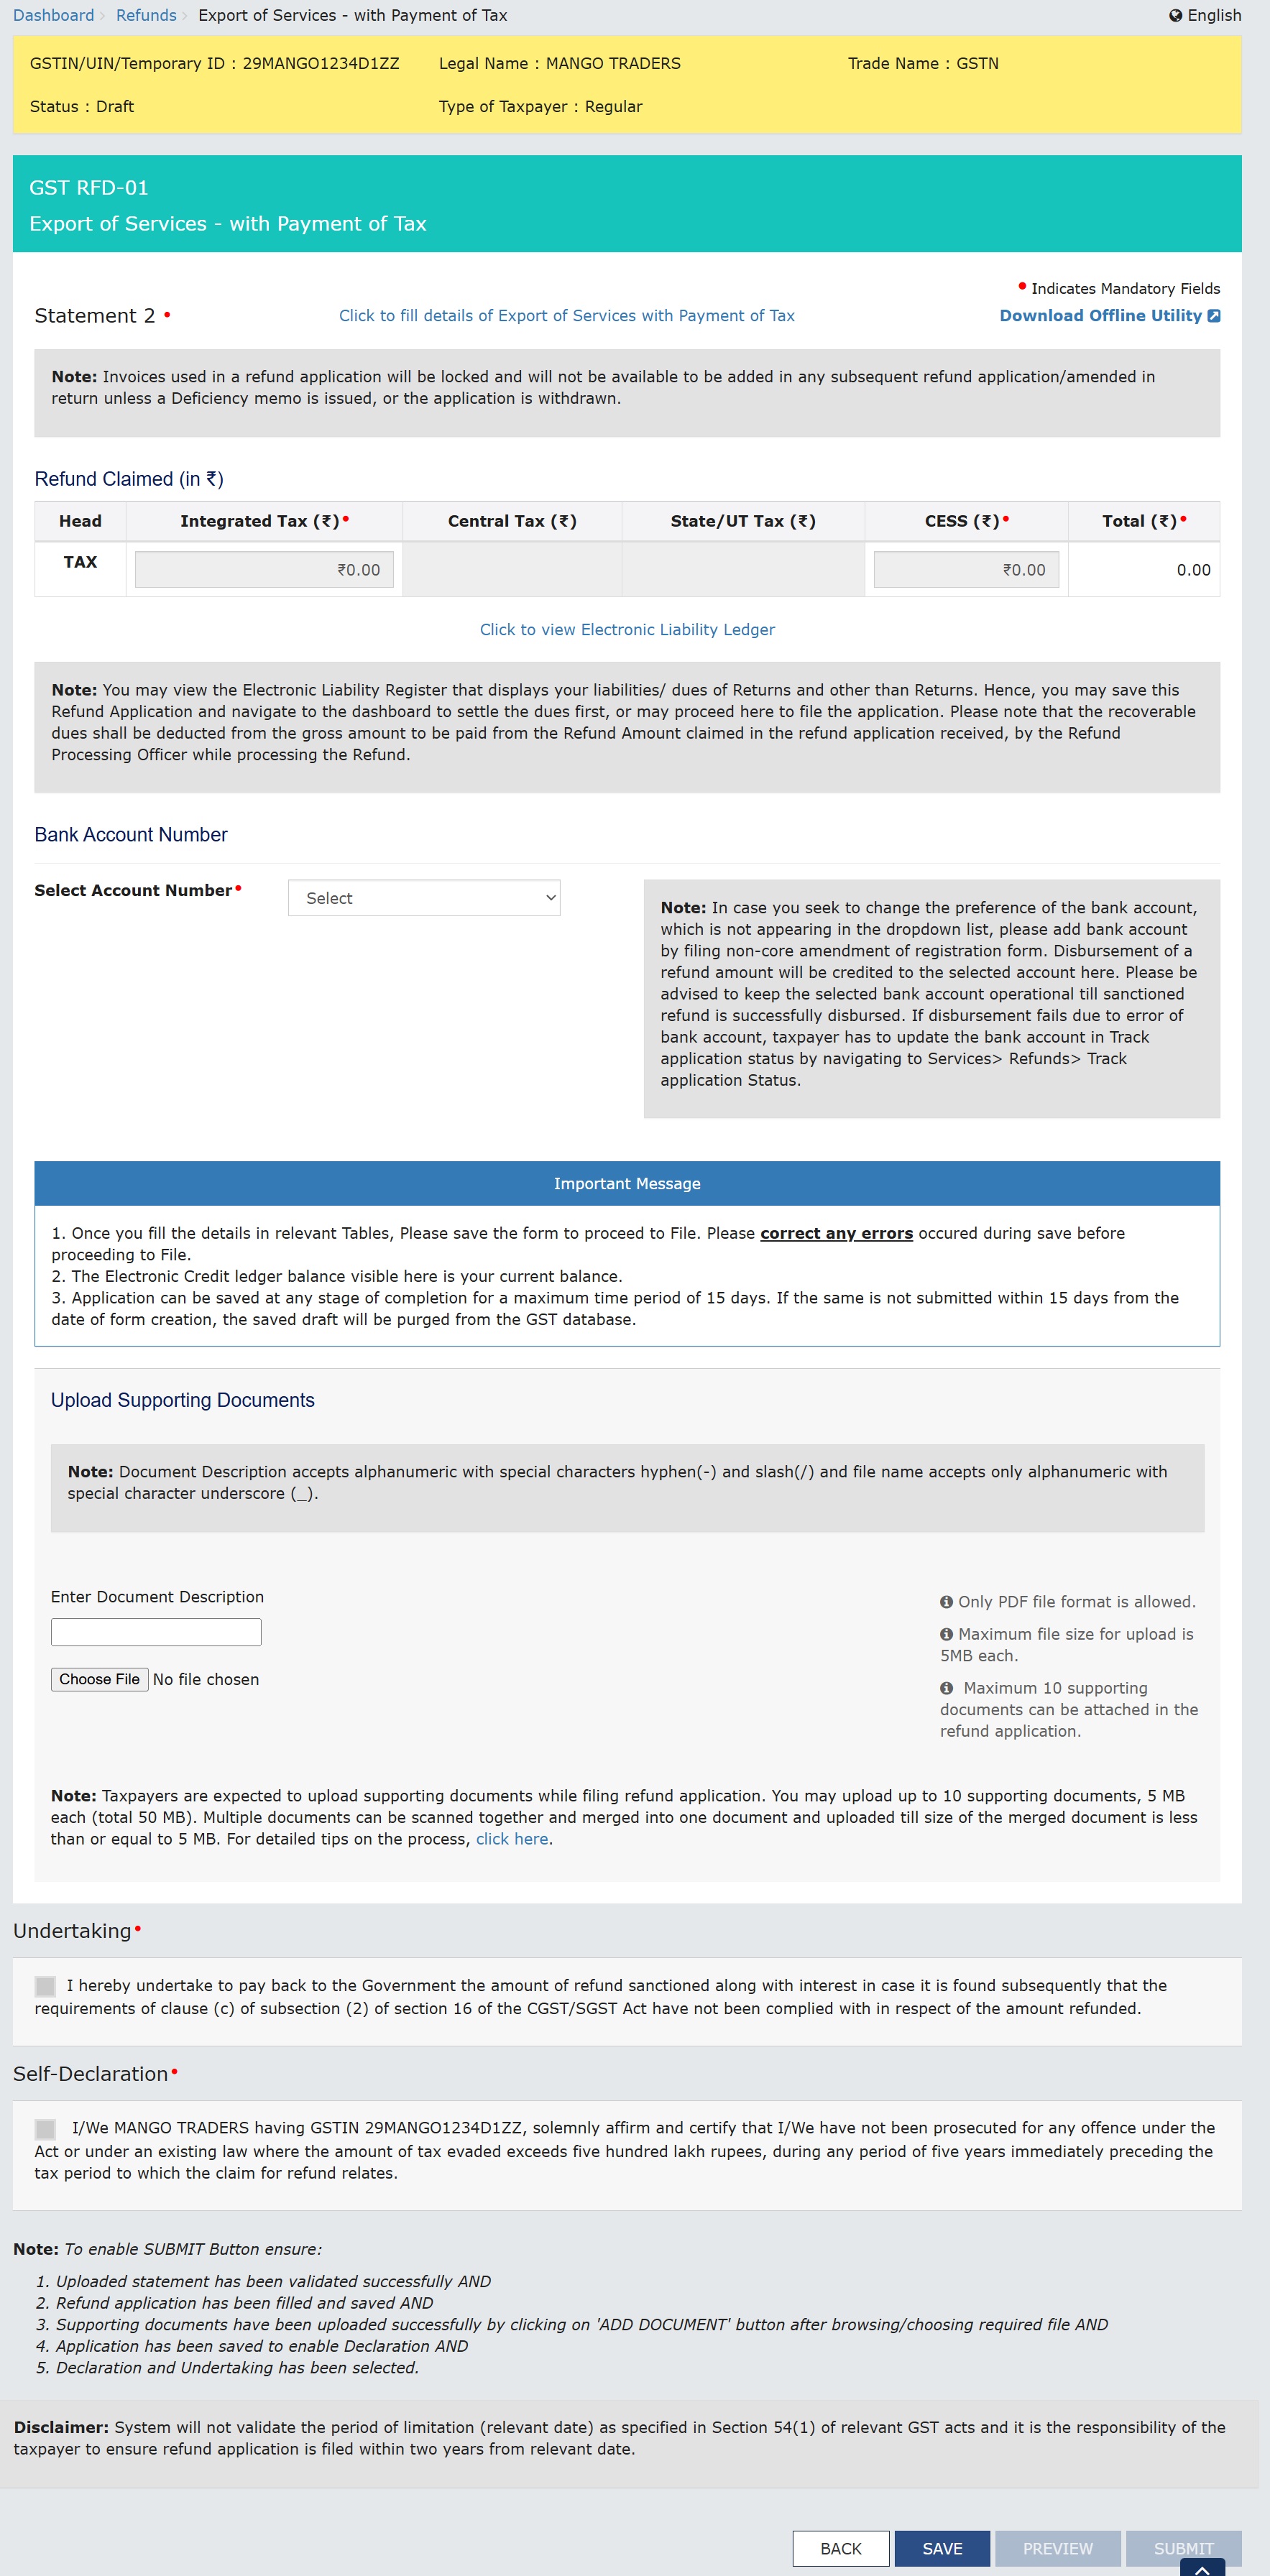
8. The GST RFD-01 - Export of Services -with Payment of Tax page is displayed.
Note 1:
a. The invoices uploaded in Statement 2 of GST RFD-01 - Exports of services with payment of tax that were already reported in GSTR-1 of any of the tax periods till the date of filing of the refund application. Such invoices will be restricted for further usage in the refund application. If the taxpayer tries to again use the same invoice for filing the refund application, then the same record will become part of invalid documents.
b. Further, unlocking of invoices, which are restricted for further usage in the refund application, can be done if the deficiency memo is issued by the tax officer or the application is withdrawn by the taxpayer. If a refund application is withdrawn or a deficiency memo is issued, then the taxpayer will be able to use the same invoices which were part of the earlier filed refund applications.
c. A disclaimer will be displayed on the screen stating that system will not validate the period of limitation (relevant date) as specified in Section 54(1) of relevant GST acts and it is the responsibility of the taxpayer to ensure refund application is filed within two years from relevant date.
Note 2: The same invoice cannot be used in filing another refund application, a note regarding the same will be displayed on the screen.

First you need to download the offline utility, upload document details of export of services with Integrated Tax and then file Refund on account of export of services with payment of tax.
Click the hyperlink below to know more about them.
Download Offline Utility - To download offline utility for statement 2 and enter details of export of services with Integrated Tax for which refund has to filed
Upload details of export of services with Integrated Tax -
Export of Services -with Payment of Tax - To upload document details of Export of Services -with Payment of Tax
Export of Services -with Payment of Tax - To enter details for refund on account of export of services with Integrated Tax on the GST Portal
9. Click the Download Offline Utility link.

10. Click the PROCEED button.
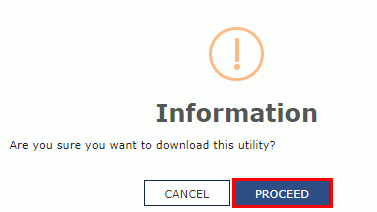
11. The zip file is downloaded. Right click on the zip file and select Extract All to unzip the downloaded file.

12. Statement 2 template would be downloaded. Open the excel sheet.

13. Once the template is downloaded, you need to enter the document details for which refund has to be claimed. Enter the GSTIN for which refund has to be claimed.
14. Enter the GSTIN of recipient, document details and details of tax paid. The document includes an invoice, a Debit note or a Credit note. Multiple Debit note or Credit note issued against invoices can also be entered in this statement.

Note:
Document Date cannot be prior to 1st July 2017. document date can be on or after 1stJuly 2017.
BRC/FIRC date can be prior to 1stJuly 2017.
You need to enter Unique BRC/FIRC details, as separate rows in Statement 2.

15. Click the Validate & Calculate button.

16. The total number of records in the sheet is displayed. Click the OK button.

In case of Error:
17.1. Error is displayed in the Error column. Rectify the error.
Note: Taxpayer will not receive any error message while he/she enters the same BRC/FIRC number against multiple invoices in a particular utility.

17.2. Click the Validate & Calculate button.

17.3. Notice that the Error column is blank now after rectification.
18. Click the Create File To Upload button.

19. Browse the location where you want to save the file.
20. Enter the name of the file and click the SAVE button.

21. A success message is displayed that file is created and you can now proceed to upload the file on the GST Portal. Click the OK button.

Upload document details of Export of Services -with Payment of Tax
22. Click the link Click to fill the details of Export of Services -with Payment of Tax.

23. Click the CLICK HERE TO UPLOAD button.

24. Browse the location where you saved the JSON file. Select the file and click the Open button.

25.1. A success message is displayed that Statement has been uploaded successfully. You can click the Download Unique documents link to view the documents that has been uploaded successfully.

25.2. Unique documents that has been uploaded successfully are displayed.

26. Select the Declaration checkbox.

27. Click the PROCEED button.

28. Click the VALIDATE STATEMENT button.

29.1. In case any statement is validated with error, click the Download Invalid document link.

29.2 Invalid document excel sheet is downloaded on your machine. Open the invalid document excel sheet. Error details are displayed.

29.3 (a). If your statement has been uploaded/validated with error, rectify the error in the JSON file and upload these documents on the GST Portal again, as per process described above.
Note: You need to upload only the error documents again by clicking the CLICK HERE TO UPLOAD button.
29.3 (b). If you don't have any error and statement has been validated, and then you want to update/delete the statement, then you would have to first delete the whole statement and upload a new statement of documents again if needed.

30. Once the statement is validated, you will get a confirmation message on screen that the statement has been submitted successfully for validation. Click the BACK button.

Export of Services -with Payment of Tax
31. In the Table Refund Amount Claimed, the amount of refund will get auto populated based on the statement uploaded. The amount for refund to be claimed auto-populated from statement is downward editable.
32. You can click the hyperlink Click to view Electronic Liability Ledger to view details of Electronic Liability Ledger that displays your liabilities/ dues of Returns and other than Returns.

33. Click the GO BACK TO REFUND FORM to return to the refund application page.

34. Select the Bank Account Number from the drop-down list.

35. Under section upload Supporting Documents, you can upload supporting documents (if any).

36. Click on the ADD DOCUMENT button if you want to add more documents and click on the delete button, in case you want to delete any document.

Note: For detailed tips on the upload supporting documents process, click on the below hyperlink.

Upon clicking the hyperlink, a new document is opened in PDF format.


37. After adding all the details, click on the SAVE button.

38. A success message is displayed that “Your application has been saved. You can retrieve this application and file within 15 days from today. You can access the Application from Services > Refunds > My Saved/Filed Applications and file on the GST Portal.”

39. Click the PREVIEW button to download the form in PDF format.

40. Form is downloaded in the PDF format.

41. Select the Undertaking and Self-Declaration checkboxes.
42. Click the SUBMIT button.

43. A confirmation message is displayed that "Statement submitted successfully." Click the PROCEED button.


44. Select the Declaration checkbox.
45. In the Name of Authorized Signatory drop-down list, select the name of authorized signatory.
46. Click the FILE WITH DSC or FILE WITH EVC button.

In Case of DSC:
a. Click the PROCEED button.

b. Select the certificate and click the SIGN button.
In Case of EVC:
a. Enter the OTP sent to email and mobile number of the Authorized Signatory registered at the GST Portal and click the VERIFY button.
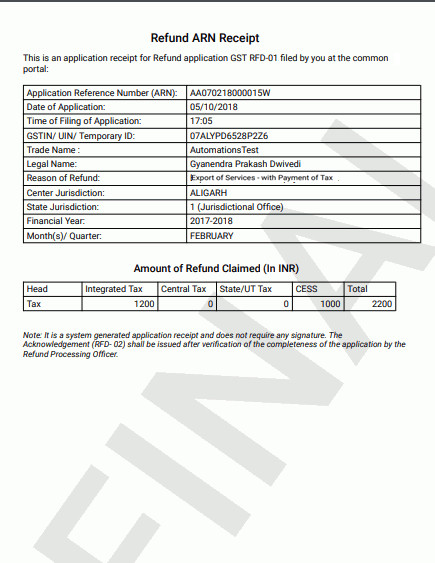
47. The success message is displayed and status is changed to Submitted. Application Reference Number (ARN) receipt is downloaded and ARN is sent on your e-mail address and mobile phone number. Click the PDF to open the receipt.
Notes:
The system generates an ARN and displays it in a confirmation message, indicating that the refund application has been successfully filed.
GST Portal sends the ARN to registered e-mail ID and mobile number of the registered taxpayer.
Filed applications (ARNs) can be downloaded as PDF documents using the My Applications option under Services.
Filed applications can be tracked using the Track Application Status option under Refunds.
Once the ARN is generated on filing of form RFD-01, refund application shall be assigned to Jurisdictional Refund Processing Officers for processing. The application will be processed and refund status shall be updated.
The disbursement is made once the concerned Tax Official processes the refund application.

48. ARN receipt is displayed.