
To respond to the notice seeking clarifications on the GST Portal, perform the following steps:
In case of Exisiting Registration:
1. Access the https://www.gst.gov.in/ URL. The GST Home page is displayed.
2. Click the REGISTER NOW link.
3. Select the Temporary Reference Number (TRN) option.
4. In the Temporary Reference Number (TRN) field, enter the TRN received.
5. Click the PROCEED button.
6. In the Mobile / Email OTP field, enter the OTP you received on your mobile number and email address. OTP is valid only for 10 minutes.
Note:
OTP sent to mobile number and email address are same.
In case OTP is invalid, try again by clicking the Click here to resend the OTP link. You will receive the OTP on your registered mobile number or email ID again. Enter the newly received OTP again.
7. Click the PROCEED button.

1. Login to the GST Portal with valid credentials.
2. Click Services > Registration> Application for Filing Clarifications command or Services > User Services > My Saved Applications.


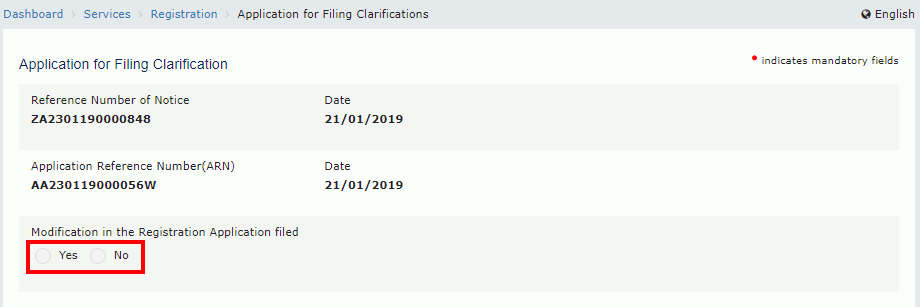
3. In the Reference No. of Notice field, enter the reference number specified on the notice which you have received for filing the clarifications. Or In the Application Reference Number (ARN) field, enter the application reference number received corresponding to the application submitted. Click the SEARCH button.
Note: Please use Reference Number of Notice or Application Reference Number (ARN) as applicable to reply to Show Cause Notice.

4. In case of new registration application, in the Modification in the Registration Application filed field, select Yes or No.
4.1 In case of Yes:
a. Click the PROCEED button.

4.1 b A warning pop up will be displayed on the screen. Select the OPEN FIELDS WITH QUERIES RASIED THROUGH REG-03 option if you want to edit only the fields for which Notice has been issued by the tax officer.
Note1: Select the OPEN ALL ALLOWED FIELDS option if you want to edit all the allowed fields while submitting response in GST REG 04.
Note2: This is applicable for Regular, Casual, Composition, ISD, SEZ Developer and SEZ Unit only.

Note 3: Click the State Specific Information tab, select the Name of the Electricity Board or Unit from the drop-down list and enter the CA Number/ Electricity Consumer Number. Click the SAVE & CONTINUE button.
Note 4: This functionality is available only for the state of Maharashtra as of now.

If you enter the incorrect CA Number, following error message will be displayed.


If you select the Name of Electricity Board/Unit, for e.g. The Brihanmumbai Electric Supply and Transport Undertaking, a popup message will be displayed to enter the CA Number provided by the BEST. Click the OK button.

4.1.c. Original application is available in editable mode for all those fields for which Notice has been issued. Edit the details and upload the additional documents wherever required.

4.1.d. On clicking of Verification tile verification page will be displayed on the screen. Enter response to the query raised by tax officer in Query Response box and this is mandatory field. In Remarks field the remarks added by officer will be displayed and it will be non-editable. Enter Additional information if you want in Additional Information field. Upload supporting document if you want by clicking on Choose File tab. Click on verification check box. Select Name of Authorized Signatory from the respective dropdown. Enter Place and click on SAVE button to save the form or click on SUBMIT WITH DSC or SUBMIT WITH EVC to proceed or click on BACK button to go back.

4.2 In case of No:
a. The application is displayed for filing clarification.

4.3 Promotors / Partners tab

For amend the details of Residential address, follow the below simple steps:
i) Type address or PIN code or latitude, longitude (enter the numeric value followed by “,” (E.g.: 22.48, 77.89, 22,7) and other alpha numeric value. You can enter minimum 2 characters based on entered values, auto suggestions will be shown.) in the Enter Address or Latitude, Longitude search box available in the right corner of the map.
ii) Based on the inputs provided, related addresses will be shown below the text box for selection.
iii) On selection of any address/location in the search box, the location icon will be pinned in the map on the selected location.
iv) Drag the location icon to pin your exact location, if required.
v) Once the location is rightly pinned in the map, click the Confirm button on the location icon.
Detailed steps are as follows:

On clicking the Confirm button, address fields under the map will be auto populated.
Note 1: If you wish to search address by latitude and longitude, you have to enter the numeric value only using comma between latitude and longitude(for e.g.-22.48, 77.89). You can also search address by PIN code or by typing minimum 2 characters of the address.

Note 2: System will treat coordinates in sequence of Latitude and Longitude if no directions are entered. If directions are entered coordinates with N or S will be treated as Latitude. Coordinates with E or W will be treated as Longitude.

Note 3 Negative values for latitude and longitude are allowed. If negative value is entered for latitude, system will consider as South direction and for longitude system will consider as West. If negative values entered with directions, then directions would be considered. Directions needs to be written for both coordinates.
iii) If the coordinates entered are outside the territorial boundaries of India, then the system will display the following message.

Note 4: If maps services are unavailable, an error pop-up message will be shown, and you can re-try after some time by clicking on CLOSE button.

Note 5 (a): If Locality/Sub-Locality does not match with the Pin-Code entered by taxpayer then following Warning message will be displayed on the screen. The Taxpayer can click on NO button and fill the correct details in the address details section and if they want to save details then click on YES button.


Note 5 (b): If the Locality/Sub-Locality are left blank, the taxpayer will get following warning messages. The Taxpayer can click on NO button and fill the required details in the address details section and if they want to proceed further leaving it blank then click on YES button.

Authorized Signatory

Note: The green star indicates Primary Authorized Signatory and user icon indicates Authorized Signatory, also Promotor.
Principal Place of Business
On clicking the Confirm button, Address field under the map will be auto populated.
Note: If you wish to search address by latitude and longitude, you have to enter the numeric value only using comma between latitude and longitude. You can also search address by PIN code or by typing minimum 2 characters (for e.g.-22.48, 77.89) of the address.

Note: If the coordinates entered are outside the territorial boundaries of India, then the system will display the following message.

Additional Place of Business
On clicking the Confirm button, Address field under the map will be auto populated.

Note: If you wish to search address by latitude and longitude, you have to enter the numeric value only using comma between latitude and longitude(for e.g.-22.48, 77.89). You can also search address by PIN code or by typing minimum 2 characters of the address.

Note: If the coordinates entered are outside the territorial boundaries of India, then the system will display the following message.
5. In the Query Repsonse field, enter your response.
6. In the Additional Information field, enter any additional information supporting the submission of your clarification application.
7. Click Choose File button to upload any supporting document.
8. Select the Verification checkbox.
9. Select the Name of Authorized Signatory from the drop-down list.
10. Enter the Place from where application is being filed.
Note: You can save the form at any point of time within the timeline of maximum 7 working days from generation of the Notice for seeking clarifications by the Tax Official.
11. In Remarks field remark added by tax officer will be displayed.
12. Submit the application using SUBMIT WITH DSC or SUBMIT WITH EVC as applicable/ eligible.

12.1 In case of SUBMIT WITH DSC:
a. Click the SUBMIT WITH DSC button.
Note: If the principal place of business or additional place of business is marked as specified premises earlier by filing annexure VIII and it is edited while filing clarification, the following warning popup will appear. Click on the OK button to proceed.

b. Click the PROCEED button.
c. Select the certificate and click the SIGN button.
12.2 In case of SUBMIT WITH EVC:
a. Click the SUBMIT WITH EVC button.
b. Enter the OTP sent to email and mobile number of the Authorized Signatory registered at the GST Portal and click the VALIDATE OTP button.
13. A success message is displayed. Intimation of submission of the form by the Taxpayer is sent via SMS to the applicant on the registered mobile number. Email is sent to the applicant as well the authorized signatory.

To respond to the notice seeking clarifications on the GST Portal, perform the following steps:
In case of Exisiting Registration:
1. Access the https://www.gst.gov.in/ URL. The GST Home page is displayed.
2. Click the REGISTER NOW link.
3. Select the Temporary Reference Number (TRN) option.
4. In the Temporary Reference Number (TRN) field, enter the TRN received.
5. Click the PROCEED button.
6. In the Mobile / Email OTP field, enter the OTP you received on your mobile number and email address. OTP is valid only for 10 minutes.
Note:
OTP sent to mobile number and email address are same.
In case OTP is invalid, try again by clicking the Click here to resend the OTP link. You will receive the OTP on your registered mobile number or email ID again. Enter the newly received OTP again.
7. Click the PROCEED button.
1. Login to the GST Portal with valid credentials.
2. Click Services > Registration> Application for Filing Clarifications command or Services > User Services > My Saved Applications.

3. In the Reference No. of Notice field, enter the reference number specified on the notice which you have received for filing the clarifications. Or In the Application Reference Number (ARN) field, enter the application reference number received corresponding to the application submitted. Click the SEARCH button.
Note: Please use Reference Number of Notice or Application Reference Number (ARN) as applicable to reply to Show Cause Notice.
4. In case of new registration application, in the Modification in the Registration Application filed field, select Yes or No.

4.1 In case of Yes:
a. Click the PROCEED button.

b. A warning pop up will be displayed on the screen. Select the OPEN FIELDS WITH QUERIES RASIED THROUGH REG-03 option if you want to edit only the fields for which Notice has been issued by the tax officer.
Note: Select the OPEN ALL ALLOWED FIELDS option if you want to edit all the allowed fields while submitting response in GST REG 04.

c. Original application is available in editable mode for all those fields for which Notice has been issued. Edit the details and upload the additional documents wherever required.

Note: Taxpayer cannot select option from Type of Supply dropdown list , it will be non-editable. But according to option selected from Type of Supply dropdown list some entry field will be vary and taxpayer can enter the details .
Rest of the entry fields will be same.
Case I: When option a is selected, following Screen will be displayed.

Case II: When option b is selected, following Screen will be displayed.

Case III: When option c is selected, following Screen will be displayed.

4.2 In case of No:
a. The Application is for Filing Clarification will be displayed on the screen. In the Query Repsonse field, enter your response. In the Additional Information field, enter any additional information supporting the submission of your clarification application.Click Choose File button to upload any supporting document. Select the Verification checkbox. Select the Name of Authorized Signatory from the drop-down list. Enter the Place from where application is being filed. Submit the application using SUBMIT WITH EVC button to proceed.

Note: You can save the form at any point of time within the timeline of maximum 7 working days from generation of the Notice for seeking clarifications by the Tax Official.
b. Enter the OTP and click on VALIDATE OTP button to proceed.

c. A message of successful submission will be displayed on the screen.
