
Amendment to Core fields require approval by the Tax Officials. Core fields include the following:
Any change in legal/ trade name of business, not involving change in PAN
Principal place of business
Additional Place of Business (Other than change in State)
Addition or deletion of Partners/Karta/Managing Directors and whole time Director / Members of Managing Committee of Associations / Board of Trustees/ Chief Executive officer or equivalent etc.
Note:
If you have already applied for amendment of core field and ARN is generated and the application is under processing by any Tax authority, then you cannot apply for amendment of core field till the time your earlier application for core amendment is disposed by the concerned tax authority.
Since any change in the “Trade Name" triggers issuance of new Registration Certificate, it is kept as core amendment process flow.
To amend the information provided in the core fields during registration, you need to perform the following steps:
1. Access the www.gst.gov.in URL. The GST Home page is displayed.
2. Login to the GST Portal with valid credentials.
3. Click the Services > Registration > Amendment of Registration Core Fields link.

As required, the Taxpayer can amend information in the editable fields in the tabs as mentioned below:
Business Details tab:
The Business Details tab is selected by default.
a) Select the field which you wish to edit by clicking on the Edit icon (white black pen icon).
b) Edit the desired details and select the Date of Amendment using the calendar.
c) In the Reasons field, enter the reason for amendment of information provided in the Core fields.
d) Click the SAVE button.
Note: Up to 9 additional trade names can be added.

e) Once all the changes are done, click the Save & CONTINUE button.

Note 1: SEZ Unit/SEZ Developer Taxpayers can click on the SEZ Details edit icon to make amendments in the SEZ related fields.

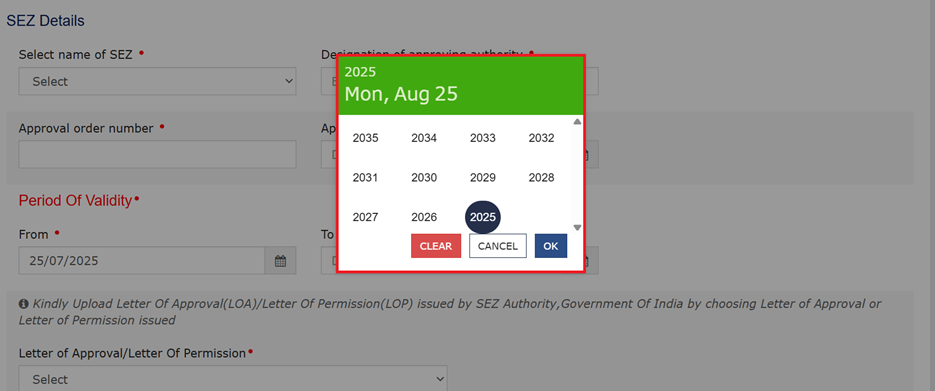
Note 2: The 'To' date in the Period of Validity field can be selected for a maximum of 10 years from the current date.
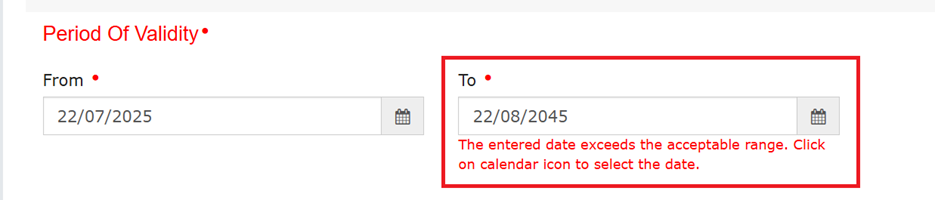

Note 3: If any date beyond 10 year limit is selected or manually entered, an error message will be displayed upon form submission.

Principal Place of Business tab:
The form is displayed for editing. Edit the desired fields.
Note: On landing page, the taxpayers will be able to view the address in both data fields and in map format where the taxpayers can edit the address.

a) Scroll down the page and click the EDIT button.

For amend the details of principal/Additional place of business, follow the below simple steps:
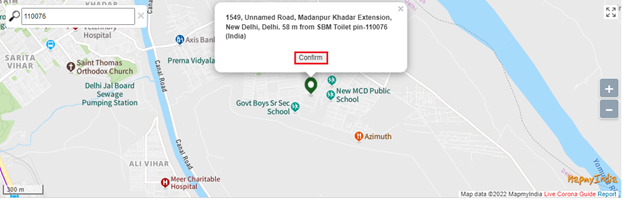
i) Type address or PIN code or latitude, longitude (enter the numeric value followed by “,” (E.g.: 22.48, 77.89, 22,7) and other alpha numeric value. You can enter minimum 2 characters based on entered values, auto suggestions will be shown.) in the Enter Address or Latitude, Longitude search box available in the right corner of the map.
ii) Based on the inputs provided, related addresses will be shown below the text box for selection.
iii) On selection of any address/location in the search box, the location icon will be pinned in the map on the selected location.
iv) Drag the location icon to pin your exact location, if required.
v) Once the location is rightly pinned in the map, click the Confirm button on the location icon.
b) You can select the address from the Address field on the map. On typing the address, you will be given a list of address related options. Select from the list and click the Confirm button.

On clicking the Confirm button, Address field under the map will be auto populated.
Note 1: If you wish to search address by latitude and longitude, you have to enter the numeric value only using comma between latitude and longitude(for e.g.-22.48, 77.89). You can also search address by PIN code or by typing minimum 2 characters of the address.

Note 2: System will treat coordinates in sequence of Latitude and Longitude if no directions are entered. If directions are entered coordinates with N or S will be treated as Latitude. Coordinates with E or W will be treated as Longitude.

Note 3: (i) Negative values for latitude and longitude are allowed. If negative value is entered for latitude, system will consider as South direction and for longitude system will consider as West. If negative values entered with directions, then directions will be considered. Directions need to be written for both coordinates.
ii) If the coordinates entered are outside the territorial boundaries of India, then the system will display the following message.

Note 4: If maps services are unavailable, an error pop-up message will be shown, and you can re-try after some time by clicking on CLOSE button.

Note 5: (a) If Locality/Sub-Locality does not match with the PIN Code entered by taxpayer then following Warning message will be displayed on the screen. The Taxpayer can click on NO button and fill the correct details in the address details section and if they want to save details then click on YES button.


Note 5: (b) If Locality/Sub-Locality are left blank, the taxpayer will get following warning messages. The Taxpayer can click on NO button and fill the required details in the address details section and if they want to proceed further leaving it blank then click on YES button.


Note:
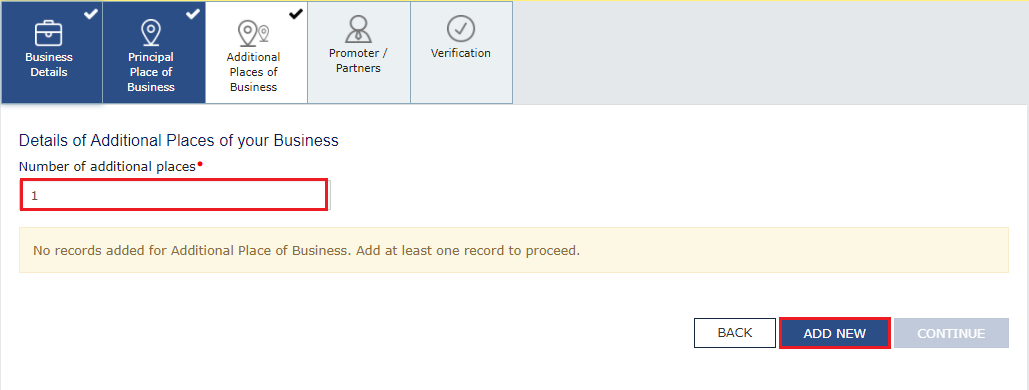
Additional Places of Business tab:
a) In the Number of additional places field, enter the number of additional places for which information is to be added.
b) Click the ADD NEW button.
The form is displayed for editing. Edit the desired details.
b) In the Reasons field, enter the reason for amendment in information.
Note: In case of amendment relating to additional place of business, no documents are required to be uploaded.
c) Select the Date of Amendment using the calendar.
d) Click the SAVE & CONTINUE button.
e) Click the SAVE button.
Note: You can click the EDIT and DELETE button to edit or delete the additional place of business

Promoter / Partners tab:
To view the details of Promoter or Partners, click the VIEW button.
To edit the details of Promoter or Partners, click the EDIT button.
To delete the details of Promoter or Partners, click the DELETE button.
a) Click the ADD NEW button to add details of Promoter or Partners.
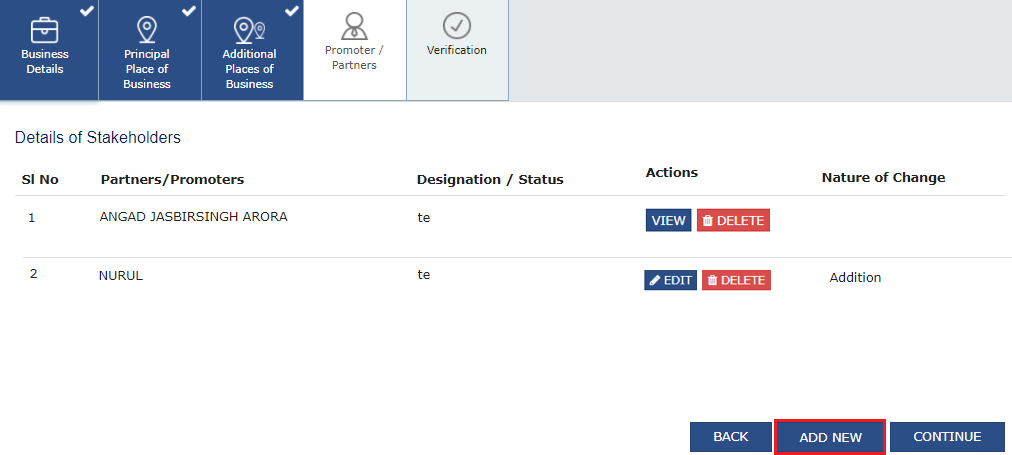
b) Enter the details of the Promoter/Partner and upload the necessary documents required as a proof for amendment.
c) In the Reasons field, enter the reason for amendment in information.
d) Select the Date of Amendment using the calendar.
e) Click the SAVE button.
f) Once details are added, click the CONTINUE button.
Verification tab:
4. In the Verification tab, select the Verification checkbox.
5. In the Name of Authorized Signatory drop-down list, select the authorized signatory.
6. In the Place field, enter the name of the place.
7. After filling the application for Amendment of Registration, you need to digitally sign the application using Digital Signature Certificate (DSC)/ E-Signature or EVC.
Note: When a taxpayer files an amendment application to modify the Principal Place of Business (PPOB) or to add an Additional Place of Business (APOB), a pop-up warning message is displayed on click of “SUBMIT WITH DSC/SUBMIT WITH EVC” button:

Once digitally signed application for amendment of registration is filed, the message of successful submission of application is displayed. You will receive the acknowledgement in next 15 minutes on your registered e-mail address and mobile phone number. SMS and email will be sent to the primary authorized signatory intimating ARN and successful filing of the Form.
Amendment to Core fields require approval by the Tax Official. Once the amendment application is approved or rejected, you will receive a notification through SMS and e-mail message. Also the approval order (REG 15) can be viewed/ downloaded by you at the dashboard. Also, amended registration certificate containing the amended details will be available for the taxpayer to download at his dashboard.
To view the various status types refer the FAQs available at -> https://tutorial.gst.gov.in/userguide/registration/index.htm#t=Track_Application_Status.htm
To amend the information provided in the core fields during registration, you need to perform the following steps:
1. Access the www.gst.gov.in URL. The GST Home page is displayed.
2. Login to the GST Portal with valid credentials.
3. Click the Services > Registration > Amendment of Registration Core Fields link.

4. Basic Details page will be displayed on the screen. Click on the edit icon  against the required field.

5. If taxpayer wants to edit entered websites click on the  icon. Following page will be displayed on the screen.
In Enter URL field enter URL if you want to add new URL and click on ADD button. Taxpayer can edit the previously entered URL or can delete the previously added URL by clicking on EDIT or DELETE button under Action column respectively. Enter Date of Amendment and Reson for Amendment.
After editing the details click on SAVE button to save the editing or click on CANCEL button to cancel the change.

6. A message of successful editing will be displayed on the screen. Click on CONTINUE button to move further.

7. Verification page will be displayed on the screen. Click on Verification checkbox and Declaration checkbox, select Name of Authorised Signatory and enter Place in respective field. Click on SUBMIT WITH EVC to proceed.

8. Enter OTP and click on VALIDATE OTP button to proceed.

9. A message of successful submission will be displayed on the screen.

Note:
(i) If you have already applied for amendment of core field and ARN is generated and the application is under processing by any Tax authority, then you cannot apply for amendment of core field till the time your earlier application for core amendment is disposed by the concerned tax authority.
(ii) Since any change in the “Trade Name" triggers issuance of new Registration Certificate, it is kept as core amendment process flow.
(iii) If an Application for Withdrawal from Registration under Rule 14A (REG-32) is pending, you will not be able to file the application for Amendment of Registration Core Fields.
