For registering yourself as a Non-Resident Online Services Provider on the GST Portal, perform the following steps:
1. Access the https://www.gst.gov.in/ URL. The GST Home page is displayed.
2. Click Services > Registration > New Registration option.
![]()
The Application form is divided into two parts as:
3. The New Registration page is displayed. Select the New Registration option.

4. From I am a drop down list, select the Non-Resident Online Services Provider and /or Non Resident Online Money Gaming Supplier as the type of taxpayer to be registered.

5. In the Legal Name of the Person field, enter the legal name of person as mentioned in the PAN database.
6. In the Permanent Account Number (PAN) of Person field, enter your Permanent Account Number. This is not a mandatory field.
Note: In case you don’t have PAN, you can apply for PAN. To do so, click the here link.
7. In the Tax identification number (TIN) / Unique Number field, enter Tax Identification Number or Unique number of the country of origin.
8. In the Name of the Authorized Signatory field, enter the name of your Authorized Signatory who belongs to India as per the PAN database.
9. In Permanent Account Number of the Authorized Signatory, enter the PAN of the Authorized Signatory who belongs to India. This is not a mandatory field.
10. In the E-mail Address of Authorized Signatory field, enter the e-mail address of the Primary Authorized Signatory.
11. In the Mobile Number of Authorized Signatory field, enter the valid Indian mobile number of the Primary Authorized Signatory.
Note: Mobile Number of Authorized Signatory is optional to be mentioned here.
12. In the Type the characters you see in the image below field, enter the captcha text.
13. In the Do you have a representative appoined in India field, select Yes if you have a representative appointed in India.
14. In the Name of the representative appointed in India field, enter the name of your representative appointed in India.
15. In the Permanent Account Number (PAN) of the representative in India field, enter the Permanent Account Number of your representative appointed in India.
16. In the Email Address of the representative in India field, enter the email ID of your representative appointed in India.
17. In the Mobile number of the representative in India field, enter the mobile number of your representative appointed in India.
18. In the Type the characters you see in the image below field, enter exactly the same characters as you see in the image.
19. Click the PROCEED button.
Note: On click of the “Proceed” button, if the OTP’s are validated, the registration form is displayed and “Temporary Reference Number (TRN)” would be generated and same will be communicated to the applicant through e-mail and SMS (if mobile number is entered). Same will also be communicated through a Pop-Up message.
Since mobile number is optional, so if the Mobile number of the Primary Authorized Signatory is entered, then only SMS will be sent.

20. A note is displayed. Click the OK button.

Note: On clicking proceed, GST Portal displays all the GSTINs / Provisional ID’s / UINs / GSTP IDs mapped to the same PAN across India. Click the PROCEED button.

Note:
You can click the DOWNLOAD button to download the existing registration details in PDF format.
Following Color code has been used to donate different status of the ARN:
Green Color: Green color reflects the Approved Registration Application.
Red Color: Red color reflects the Rejected Registration Application.
Orange Color: Orange color reflects the Pending for Processing/Pending for order Registration Application.
After successful validation, you will be directed to the OTP Verification page.
21. In the Mobile OTP field, enter the OTP you received on your mobile number. OTP is valid only for 10 minutes. You will receive a Mobile OTP only in case you have provided mobile number in the previous screen.
22. In the Email OTP field, enter the OTP you received on your email address. OTP is valid only for 10 minutes.
Note: The OTPs sent to your mobile number and email address are different. In case the OTP is invalid, try again by clicking the Need OTP to be resent? Click here the OTP link. You will receive the OTP on your registered email ID again. Enter this newly received OTP.
23. Click the PROCEED button.

The system generated 15-digit Temporary Reference Number (TRN) is displayed.
Note: Once TRN is generated, you will receive the TRN information on your e-mail address as well as on your mobile number. The expiry date of the TRN will also be displayed on the screen.
24. Click the PROCEED button. Alternatively, you can click Services > Registration > New Registration and select the Temporary Reference Number (TRN) radio button to login using the TRN .

25. In the Temporary Reference Number (TRN) field, enter the TRN generated.
26. In the Type the characters you see in the image below field, enter the captcha text.
27. Click the PROCEED button. The Verify OTP page is displayed. You will receive same Mobile OTP and E-mail OTP. These OTPs are different from the OTPs you received in previous step.

28. In the Mobile / E-mail OTP field, enter the OTP you received on your mobile number and e-mail address. OTP is valid only for 10 minutes.
Note: The OTPs sent to your mobile number and e-mail address are same.
In case OTP is invalid, try again by clicking the Need OTP to be resent? Click here link. You will receive an OTP on your registered mobile number or e-mail ID again. Enter this newly received OTP.
29. The My Saved Application page is displayed. Under the Action column, click the Edit icon (a white pen in blue square).
Note:
Notice the expiry date in the screenshot below. If the applicant doesn’t submit the application within 15 days, the TRN and the entire information filled against the TRN is purged after 15 days.
The status of the registration application is Draft till the application is submitted.

The Registration Application form with various tabs is displayed. On the top of the page, there are four tabs for Business Details, Authorized Signatory, Bank Accounts and Verification. Click each tab to enter details.
Note: The details entered in the Bank Accounts tab are optional and non-mandatory w.e.f. Dec 27, 2018. You can now enter the bank accounts details by filing an Amendment application only. Post grant of GSTIN, when you login for the first time on the GST Portal, you will be prompted to file a non-core amendment application to enter Bank Accounts details.

Business Details tab:
The Business Details tab is selected by default. This tab displays the business details required for registration.
Note: The Legal Name of the person, Permanent Account Number (PAN) of person and Tax Identification Number (TIN)/Unique Number fields are auto-populated.
a) In the Country in which incorporated drop-down list, select the country where the business is incorporated.
b) Select the Date of Commencement of the online service in India using the calendar.
c) Enter the Uniform Resource Locators (URLs) of the website through which taxable services are provided and click the ADD button.
Note: You can click the EDIT or DELETE button to edit or delete the corresponding URL.
d) Select the Range Code from the drop-down list.
e) Select the Proof of Non-Resident Online Service Provider from the drop-down list. Then, click the Choose File button to upload the proof document. If you want to delete the uploaded document, click the DELETE button.
f) Select one option from Type of Supply dropdown list. Following options will be available in drop-down list:
(a) Supply of Online Money Gaming,
(b) Supply of Online Information and Database Access or Retrieval Services and
(c) Both (a) and (b) above.
g) Click the SAVE & CONTINUE button. You will notice a black tick on the Business Details tab, indicating the completion of the tab information and notice the Profile indicating the percentage completion of the application form.
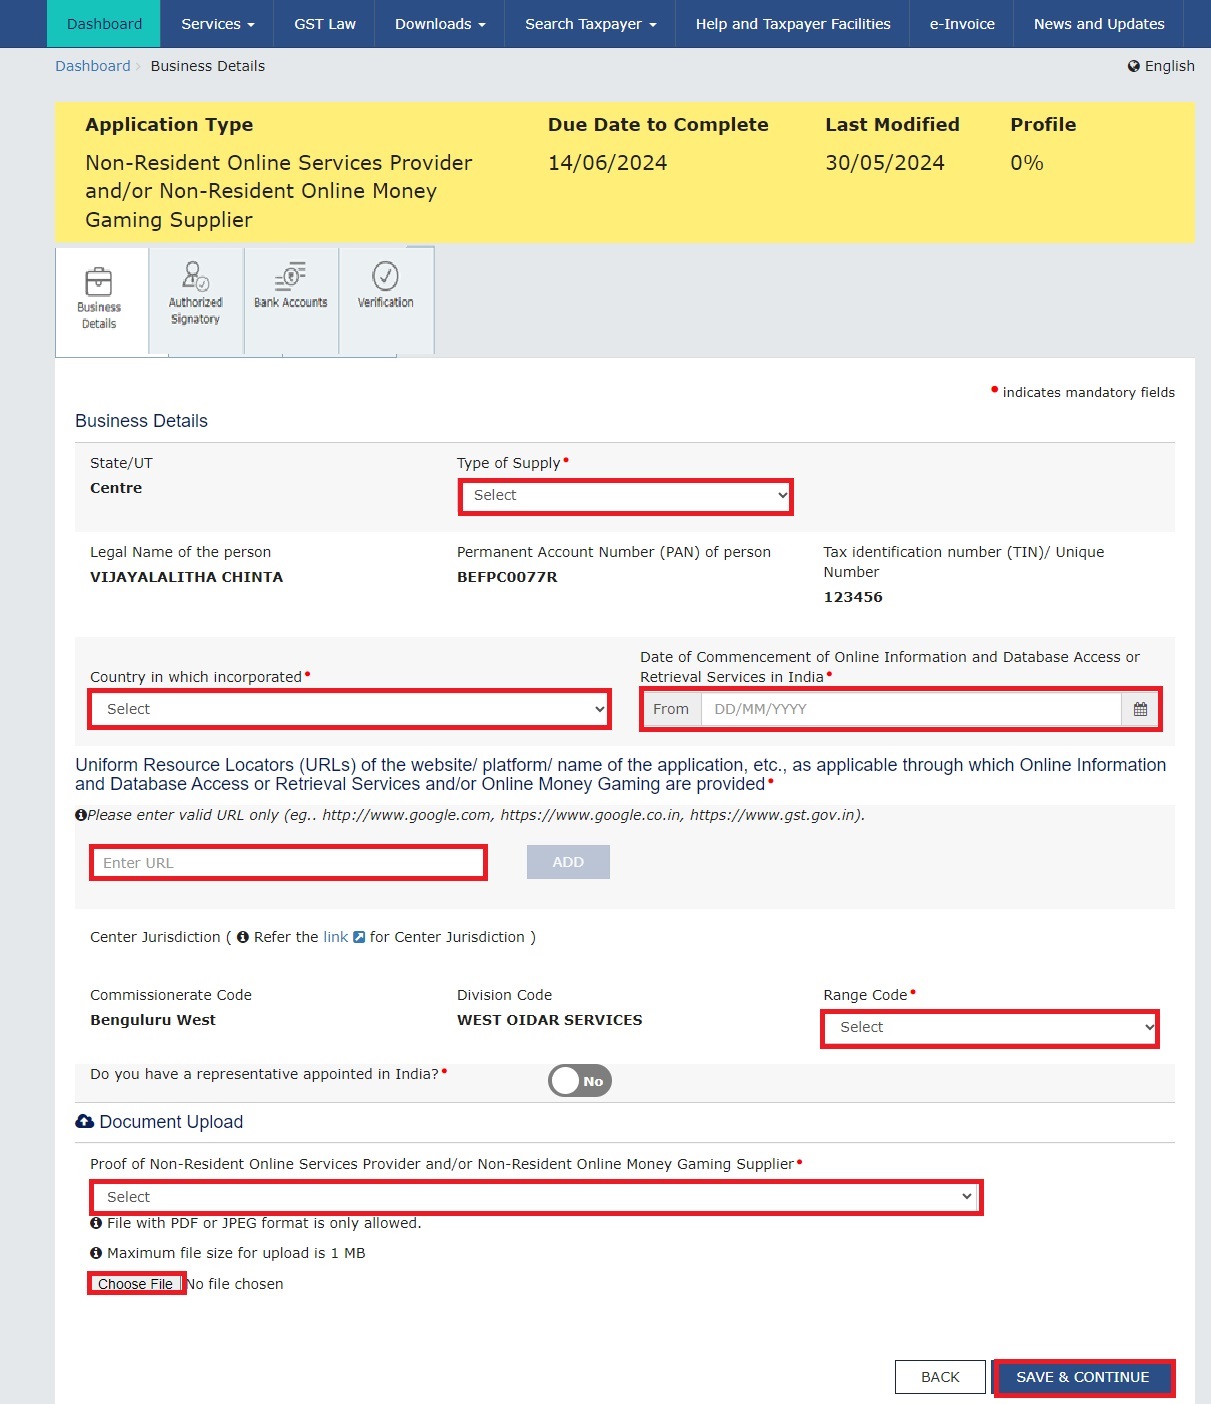
Note: On the basis of selection of option from the Type of Supply some entry field will be changed and rest of the entry fields will be same.
Case I: When option a (Supply of Online Money Gaming) is selected as Type of Supply, following Screen will be displayed.

Case II: When option b (Supply of Online Information and Database Access or Retrieval Services) is selected as Type of Supply, following Screen will be displayed.

Case III: When option c (Both (a) and (b) above) is selected as Type of Supply, following Screen will be displayed.

Authorized Signatory tab:
This tab page displays the details to be entered for Authorized signatory. Click the ADD NEW button.
Note: Authorized Signatory must be a resident of India with a valid PAN Card. Also, the details of Authorized signatory such as Name, Mobile Number (If entered in Part A of the Registration Form), E-mail address and PAN are auto-populated on this tab based on the details provided in Part A of the application form.

a) Select the Primary Authorized Signatory check box to enter the details of the primary authorized signatory.
b) In the Personal Information section, enter the personal details of the authorized signatory such as First Name, Gender, Designation and Date of Birth.
b) Enter the personal details of the authorized signatory's father such as First Name of father, Nationality and E-mail Address.
d) In the Residential Address section, enter the address details of the authorized signatory. Based on the selected state, select the district and enter the corresponding pin code. It is not mandatory to enter details in the Residential Address section.
e) In the Document Upload section, select the document type to be uploaded from the Proof of details of authorized signatory drop-down list and upload the document and a photograph of the authorized signatory using the Choose File buttons.
Note: The documents that can be uploaded as Proof of details of authorized signatory are:
Letter of Authorisation
Copy of resolution passed by BoD (Board of Directors) / Managing Committee
f) Click the SAVE & CONTINUE button and you will be directed to the next section.
Note:
For photographs, format should be JPEG and file size must not exceed 100 KB.
For Proof of details of Authorized Signatory, format should be PDF or JPEG and file size must not exceed 100 KB.

Bank Accounts tab:
Note: Details to be entered in Bank Accounts tab has been made optional and non-mandatory w.e.f. 27th Dec 2018. You can now enter the Bank Accounts details by filing an Amendment application only. Post grant of GSTIN, when you login for the first time on the GST Portal, you will be prompted to file a non-core amendment application to enter Bank Accounts details.
Although details of Bank accounts are not mandatory for OIDAR applicants (Non-Resident Online Service providers), the same is required to be added, in case of nomination of an Indian Authorised representative.
This tab page displays the details of the bank account maintained for conducting business. It is not mandatory to provide the bank details.
a) In the Total number of Bank Accounts maintained by the applicant for conducting business field, enter the number of accounts that you have and click the ADD NEW button.
Note: The total number of bank accounts maintained should be equal to the total number of bank accounts added. In case of mismatch, you will not be able to submit the form.

b) In the Account Number field, enter your bank account number.
c) In the Type of Account drop-down list, select the type of account such as Current Account, Savings Account, Cash Credit or any other type of account.
d) In the Enter Bank IFSC field, enter the IFSC code of the bank.
Note:
• In case you don’t know the IFSC code, click the here link to know the IFSC code of your bank.
• Alternatively, you can find the IFSC code in the cheque book or the cheque leaflet of your bank.
e) In the Document Upload section, select a document type from the Proof of Details of Bank Accounts drop-down list. Click the Choose file button to navigate and select the document.
Note:
You can upload PDF or JPEG files with maximum file size for upload of as 100 KB.
You can upload below documents as proof of Details of Bank Account:
First page of bank's passbook
Bank statement
Cancelled cheque having name of Taxpayer
f) Click the SAVE & CONTINUE button.
Note: In case you want to add details of more bank accounts, click the ADD NEW button.

Verification tab:
This tab displays the details of verification for the authentication of details submitted in the form.
a. Select the Verification and Declaration checkboxes.
b. In the Name of Authorized Signatory drop-down list, select the name of the authorized signatory.
c. In the Place field, enter the place from where the form is filled.
d. Click the SUBMIT WITH EVC button.

e. Enter the OTP sent to the email address of the authorized signatory registered at the GST Portal and click the VALIDATE OTP button.

The success message is displayed. You will receive the acknowledgement in next 15 minutes on your registered e-mail address and mobile phone number. The Application Reference Number (ARN) receipt is sent on your e-mail address and mobile phone number.

Once the form is submitted until the ARN is generated, the status would be Pending for Validation. On successful validation of the application form, ARN would be generated and status changes to Pending for Processing. In case the validations fails, the status would be updated as 'Validation Error'.
In case the application status shows Validation Error, you need to click the Edit button and submit the form again.
