To create, submit and file details in Form GSTR-6, perform following steps:
A. Login and Navigate to Form GSTR-6 page
B. Enter details in various tiles
C. File Form GSTR-6
D. View Consolidated Summary
E. Late Fee
F. File Return
1. Access the www.gst.gov.in URL. The GST Home page is displayed. Login to the GST Portal with valid credentials. Click the Services > Returns > Returns Dashboard command.
Alternatively, you can also click the Returns Dashboard link on the Dashboard.
2. The File Returns page is displayed. Select the Financial Year & Return Filing Period for which you want to file the return from the drop-down list. Click the SEARCH button.
3. The File Returns page is displayed. This page displays the due date of filing the returns, which the taxpayer is required to file using separate tiles.
In the GSTR-6 tile, click the PREPARE ONLINE button if you want to prepare the return by making entries on the GST Portal directly.
Note:

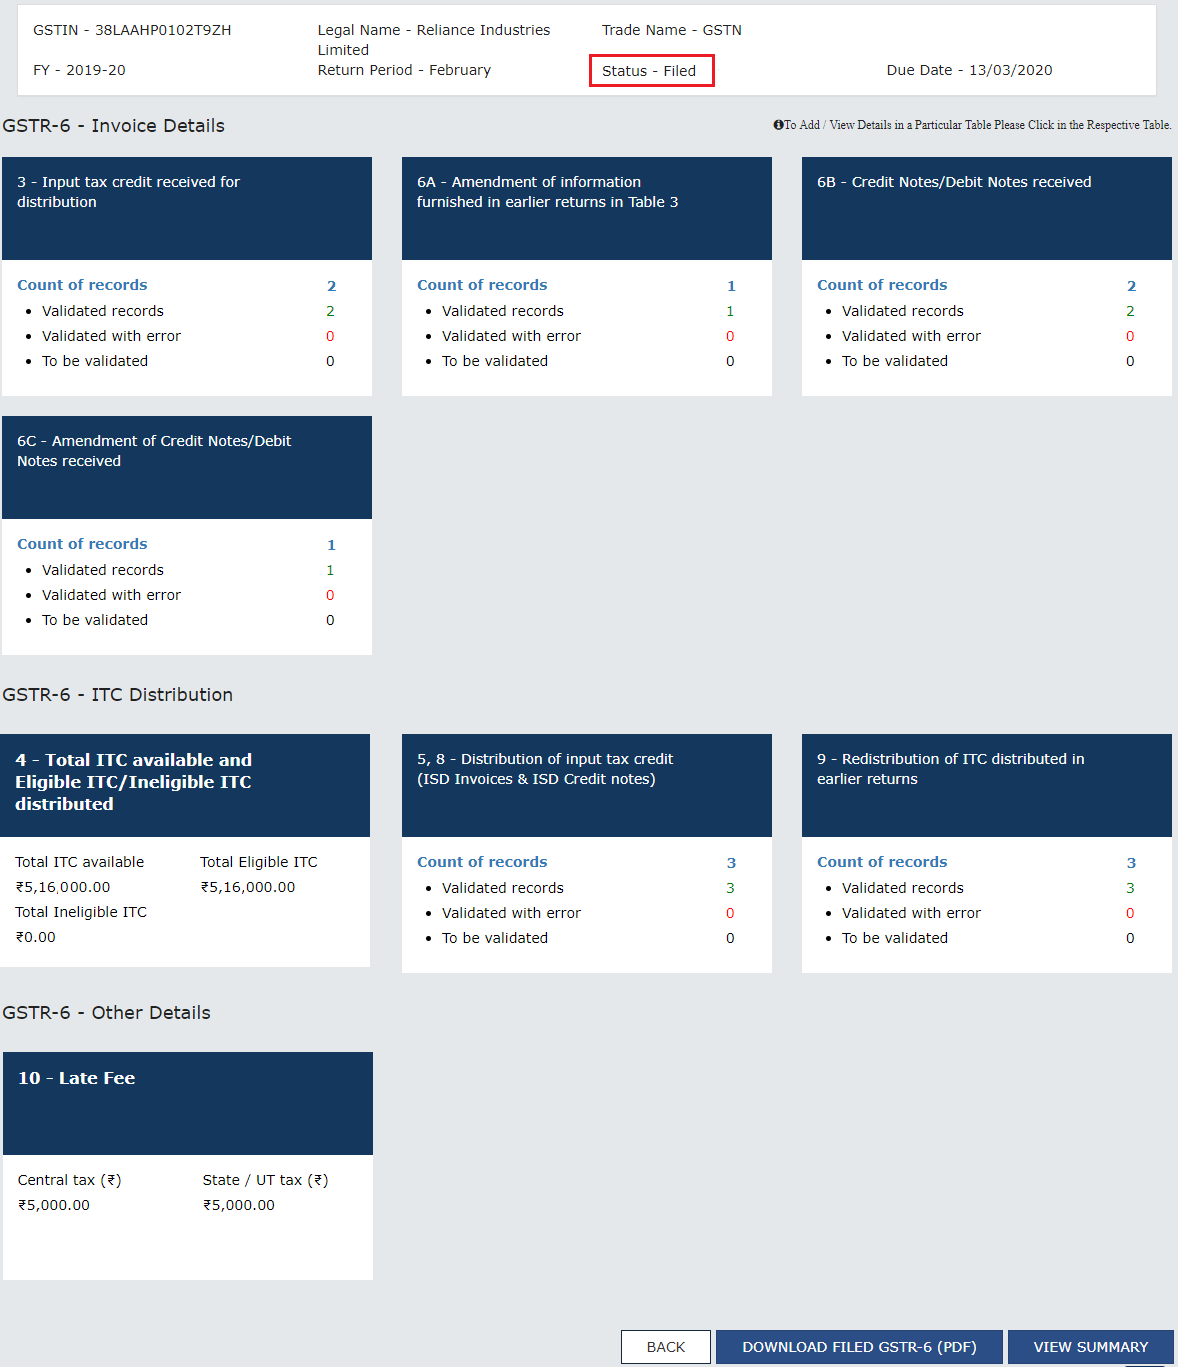
4. The GSTR-6 - Return for Input Service Distributor page is displayed.

Note:
• Validated records imply Successfully Processed records
• Validated with error imply records that are errored out or processed but have some errors
• To be validated imply records that system has received for processing but processing is not yet complete
5. There are three sub-headings representing Tables to enter relevant details. Click on the tile names to know and enter related details.
Form GSTR-6 Invoice Details:
6. Table 3 - Input tax credit received for distribution: To enter details of input tax credit received for distribution.
7. Table 6A - Amendment of information furnished in earlier returns in Table 3: To make amendments to information furnished in earlier returns in Table 3.
8. Table 6B - Credit Notes/ Debit Notes Received: To enter details of credit or debit notes received.
9. Table 6C - Amendment of Credit Notes/Debit Notes received: To make amendments to credit or debit notes received.
Form GSTR-6 ITC Distribution:
10. Table 5, 8 - Distribution of input tax credit (ISD Invoices & ISD Credit notes): To enter details of distribution of input tax credit for ISD invoices and ISD Credit notes.
11. Table 9 - Redistribution of ITC distributed in earlier returns - To enter details of ITC available and eligible and ineligible ITC redistributed.
12. Table 4 - Total ITC available and Eligible ITC/Ineligible ITC distributed: To view details of ITC available and eligible and ineligible ITC distributed.
GSTR-6 - Other Details:
17. Table 10- Late Fee: To view Late Fee details for the return period.
Note 1: This tile can only be accessed after return has been filed.
Note 2: ISD cannot enter invoices/debit notes/credit notes of cancelled suppliers having date after the effective date of cancellation of registration of supplier.
Invoices/debit/credit notes should be dated on or after the date of grant of registration of ISD as well as supplier and before the effective date of cancellation of registration of supplier.
Similarly, in case of amendment tables, revised invoices/debit/credit notes should be dated on or after the date of grant of registration of ISD as well as supplier and before the effective date of cancellation of registration of supplier.
6.1. To view or edit details of input tax credit received for distribution, click the 3-Input tax credit received for distribution tile.

6.2. Click the ADD MISSING INVOICE DETAILS button to add the invoices.

6.3. The B2B-Add Invoice page is displayed. Please read carefully message in the top of the page.
6.4. In the Supplier’s GSTIN field, enter the GSTIN of the supplier who supplied the services. As you enter the supplier's GSTIN, Supplier's name is auto-populated and screen is expanded for displaying/entering item-details.
6.5. In the Invoice No. field, enter the invoice number.
6.6. In the Invoice Date field, select the date on which the invoice was issued using the calendar.
6.7. In the POS field, select the place of supply where the supplies were delivered by the supplier. Based on the State/UT selected in POS, Supply Type field is auto-populated.
Note: GST Portal would determine whether it is an Inter-State or Intra-State transaction based on the State/UT where supplier is registered and State that has been selected in POS field.
6.8. In the Total Invoice Value field, enter the total value of invoice for which services are received. In the Cess field, enter the cess amount.
6.9. The Amount of tax fields are auto-populated based on the values entered in Taxable Value fields, against a particular tax rate. However, you can edit the data in amount of tax fields.
6.10 (a). In case of Intra-State transaction:
In case the POS (place of supply) of the services is in the same State as that of the supplier, the transaction is an Intra-State transaction.
Note- Fields for Central Tax, State/UT Tax and Cess field only will appear for entry.
i) In the Taxable Value field against the specific rates, enter the taxable value of the goods or services.
ii) In the Cess field, enter the cess amount.
Note: The Amount of tax fields are auto-populated based on the values entered in Taxable Value fields, against a particular tax rate. However, you can edit the data in amount of tax fields.

iii). You will be directed to the previous page and invoice is added. Click on the Supplier GSTIN hyperlink to view invoice summary.

iv). B2B Invoice Summary is displayed.

6.10 (b). In case of Inter-State transaction:
In case the Place of Supply (POS) is different from the State of the supplier, transaction becomes an Inter-State transaction.
Notice that fields for Integrated Tax and Cess will appear for entry.
i) In the Taxable Value field against the rates, enter the taxable value of the goods or services.
ii) In the Cess field, enter the cess amount.
Note: The Amount of tax fields are auto-populated based on the values entered in Taxable Value fields, against a particular tax rate. However, you can edit the data in amount of tax fields.

iii). You will be directed to the previous page and invoice is added.
Note: You can click the Supplier's GSTIN link under Supplier Details column to view the invoice details.
6.11. Click the BACK button to go back to the Form GSTR-6 landing page.

6.12. The 3-Input tax credit received for distribution tile in Form GSTR-6 will reflect the number of invoices added.

7.1. To make amendments to information furnished in earlier returns in Table 3, click the 6A - Amendment of information furnished in earlier returns in Table 3 tile.

7.2. Select the Financial Year from the drop-down list.
7.3. In the GSTIN field, enter the GSTIN of the supplier.
7.4. In the Original Invoice No. field, enter the invoice number which you want to amend from the earlier tax period.
7.5. Click the AMEND INVOICE button.

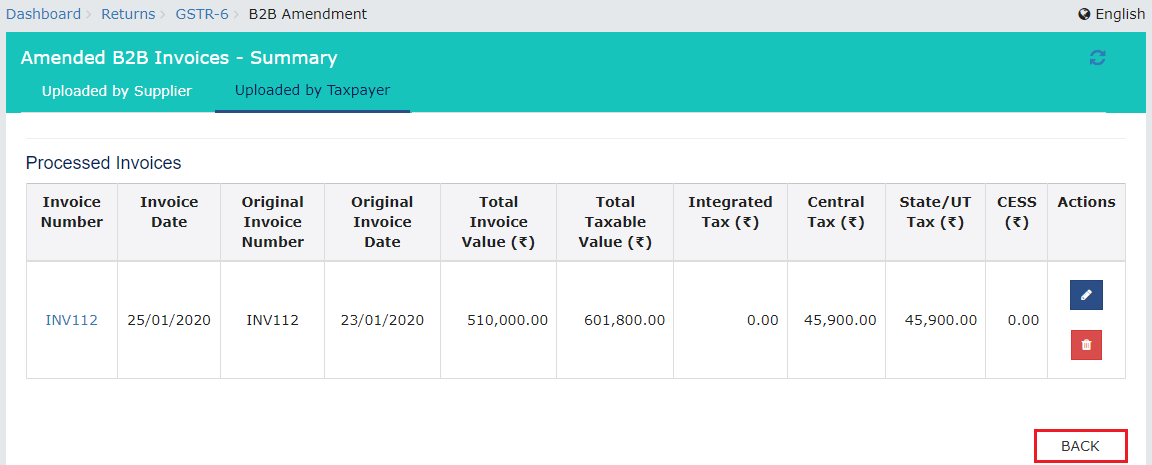
7.6. You can provide the revised invoice number, revised invoice date, total invoice value, POS and taxable value for the GSTIN. Make amendments to the details as required. Make amendments to the details as required. Click the SAVE button.

7.7. You will be directed to the previous page and a message is displayed that “Request accepted, Subject to validation” successfully.
Note:
a. The status of the amended invoice is shown as Processed and will be visible in “Uploaded by Taxpayer” section.
b. Here, you can also edit/delete the amended invoices (under Actions).
7.8. Click the BACK button.
7.9. You will be directed to the previous page and the 6A - Amendment of information furnished in earlier returns in Table 3 tile will reflect the number of such invoices amended.

8.1. To view or edit details of credit or debit notes received, click the 6B - Credit Notes/ Debit Notes Received tile.

8.2. In the Credit/Debit Notes - Supplier Details page, click the ADD CREDIT NOTE/ DEBIT NOTE button to add a new credit/ debit note.

8.3. The Credit/Debit Notes - Add page is displayed.
Note: Table below shows the difference in Credit/Debit note table before delinking and after delinking of Debit/Credit Note.
|
S. No. |
Credit/Debit Note Table before delinking of Credit/ Debit Note |
Credit/Debit Note Table after delinking of Credit/ Debit Note
|
|
1 |
While entering the Credit/ Debit note details, original invoice number and original invoice date were mandatory to be entered. |
While entering the Credit/ Debit note details or amendment in credit/ debit note details, ISD is not required to enter original invoice number and original invoice date. |
|
2 |
POS field was not available. |
Entering POS is mandatory. |
|
3 |
Supply type was determined based on Original invoice details. |
Supply type is determined on the basis of GSTIN of supplier and POS. |
|
4 |
Suppliers were issuing one credit/ debit note for each invoice. |
Supplier can issue one credit/debit note for multiple invoices. |
|
5 |
Pre-GST checkbox was available. |
Pre-GST checkbox has been removed. |
8.4. In the Supplier GSTIN field, enter name of the supplier. Supplier name is auto-populated.
8.5. From the Note Type drop-down list, select whether the details added are for a Credit or Debit Note.

8.6. In the Note Value field, enter the value of the note.
8.7. In the Credit/Debit Note No. field, enter the credit or debit note number.
Note: A Credit or Debit Note number should be unique for a given Financial Year (FY).
8.8. In the Credit/Debit Note Date field, select the date on which the credit or debit Note was issued using the calendar.
Note: The note date should be before the end date of the tax period.
8.9. From the POS drop-down list, select the POS State/UT based on GSTIN of ISD and place of supply.
8.10 (a) In case of Intra-State transaction:
In case the POS (place of supply) of the services is the same State as that of the supplier, the transaction is an Intra-State transaction.
Please note, fields for Central Tax and State/UT Tax appear for entry.
i) In the Taxable Value field against the rates, enter the taxable value of the services.
ii) In the Amount of Tax field against the rates, enter the amount of tax of the services.
iii) In the Cess field, enter the cess amount.
iv) Click the SAVE button to save the note details.

iii). You will be directed to the previous page and document is added. Click on the Supplier GSTIN hyperlink to view Credit/Debit Note summary.

iv). Credit/Debit Notes- Summary page is displayed.

8.10 (b) In case of Inter-State transaction:
In case Place of Supply (POS) is different from the State of the supplier, transaction becomes an Inter-State transaction.
Please note, fields for Integrated Tax and Cess will appear for entry.
i) In the Taxable Value field against the rates, enter the taxable value of the services.
ii) In the Amount of Tax field against the rates, enter the amount of tax of the services.
iii) In the Cess field, enter the cess amount.
iv) Click the SAVE button to save the note details.
iii). You will be directed to the previous page and document is added.
Note: You can click the Supplier GSTIN hyperlink under Supplier Details column to view the document details.
8.11. Click the BACK button to go back to the Form GSTR-6 landing page.

8.12. The 6B - Credit Notes/ Debit Notes Received tile in Form GSTR-6 will reflect the number of documents added.

9.1. To make amendments to credit or debit notes received, click the 6C - Amendment of Credit Notes/Debit Notes received tile.

9.2. Select the Financial Year from the drop-down list.
9.3. In the GSTIN field, enter the GSTIN of the supplier.
9.4. In the Original Note No. field, enter the note number which you want to amend from earlier tax period.
9.5. Click the AMEND DOCUMENT button.

9.6. You can provide the note value, revised credit/debit note number, revised credit/debit note date and POS for the GSTIN. Make amendments to the details as required. Click the SAVE button.

9.7. You will be directed to the previous page and a message is displayed that “Request accepted, subject to validation”.
Note:
a. The status of the amended credit/debit note is shown as Processed and will be visible in “Uploaded by Recipient" section.
b. Here, you can also edit/delete the amended credit/debit note (under Actions).
9.8. Click the BACK button.

9.9. You will be directed to the previous page and the 6C - Amendment of Credit Notes/Debit Notes received tile will reflect the number of such documents amended.

10.1. To view or edit details of distribution of input tax credit for ISD invoices and ISD Credit notes, click the 5, 8 - Distribution of input tax credit (ISD Invoices & ISD Credit notes) tile.

10.2. Click the ADD DOCUMENT button.

10.3. Select the Eligibility of ITC from the drop-down list.
10.4. Select the Unit Type from the drop-down list.
10.5 (a) In case of Registered unit type:
10.5 (b) In case of Un-registered unit type:
10.5 (a) In case of Registered unit type:
10.5.1. Enter the GSTIN of registered recipient.
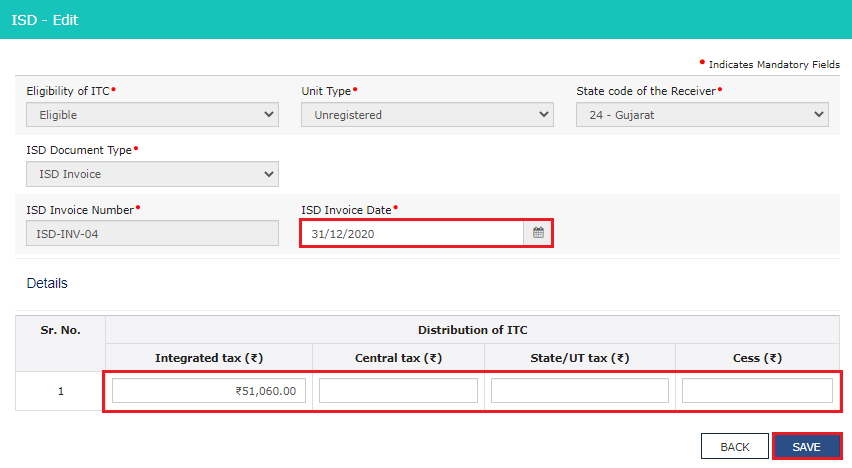
10.5.2 Select the ISD Document Type from the drop-down list.
a. In case of ISD Invoice:
10.5.3. In the ISD Invoice Number field, enter the ISD invoice number.
10.5.4. Select the ISD Invoice Date using the calendar.
10.5.5. In the ISD Credit Distribution section, enter the Integrated Tax, Central Tax, State/UT Tax and Cess.
10.5.6. Click the SAVE button.
Note: In a case where the receiving unit is located in SEZ, then distribution of Input tax credit out of IGST/CGST/SGST/UTGST will be distributed as IGST only irrespective of the SEZ State code.
i. If the recipient unit is within the State, the distributed credit is IGST or CGST and SGST/UTGST and the following entry screen will appear in which the details have to be entered.

ii. If the recipient unit belongs to another State, the distributed credit is IGST and the following screen is displayed in which the details have to be furnished.

b. In case of ISD Credit Note:
10.5.3. In the ISD Credit Note Number field, enter the ISD credit note number.
10.5.4. Select the ISD Credit Note Date using the calendar.
10.5.5. In the ISD Invoice Number field, enter the ISD invoice number.
10.5.6. Select the ISD Invoice Date using the calendar.
10.5.7. In the ISD Credit Distribution section, enter the Integrated Tax and Cess.
10.5.8. Click the SAVE button.
Note: Inter-State or Intra-State will depend on the POS of original ISD invoice against which ISD credit note is being issued. Screenshots have been provided below for reference.


10.5.8. You will be directed to the previous page and invoice is added under Processed Invoices under Eligible ITC tab. Click on the Recipient details hyperlink to view the processed invoices and credit notes.

10.5 (b) In case of Un-registered unit type:
10.5.1 Enter the State Code of the receiver.
10.5.2. Select the ISD Document Type from the drop-down list.
a. In case of ISD Invoice:
10.5.3. In the ISD Invoice Number field, enter the ISD invoice number.
10.5.4. Select the ISD Invoice Date using the calendar.
10.5.5. In the ISD Credit Distribution section, enter the Integrated Tax, Central Tax, State/UT Tax and Cess, as the case may be.
10.5.6. Click the SAVE button.
i. If the recipient unit is within State, the distributed credit is CGST and SGST and the following entry screen will appear in which the details have to be entered. It can be IGST also if the credit is to be distributed as IGST.
ii. If the recipient unit belongs to another State, the distributed credit is IGST and the following screen is displayed in which the details have to be furnished.

b. In case of ISD Credit Note:
10.5.3. In the ISD Credit Note Number field, enter the ISD credit note number.
10.5.4. Select the ISD Credit Note Date using the calendar.
10.5.5. In the ISD Invoice Number field, enter the ISD invoice number.
10.5.6. Select the ISD Invoice Date using the calendar.
10.5.7. In the ISD Credit Distribution section, enter the Integrated Tax and Cess.
10.5.7. Click the SAVE button.
Note: Inter-State or intra-State will depend on the POS of original ISD invoice against which ISD credit note is being issued. Screenshots have been provided below for reference.


10.5.8. You will be directed to the previous page and invoice is added under Processed Invoices > Pending records (These will be added after validation) under Eligible ITC tab.

Note: Similarly, you need to add the details for Ineligible ITC and this will be reflected under Ineligible ITC tab.
10.5.9. Click the BACK button and you will be directed to the previous page and the 5, 8 - Distribution of input tax credit (ISD Invoices & ISD Credit notes) tile will reflect the number of such documents amended.

In case the ITC was earlier distributed to a wrong recipient and taxpayer wants to redistribute it afresh:
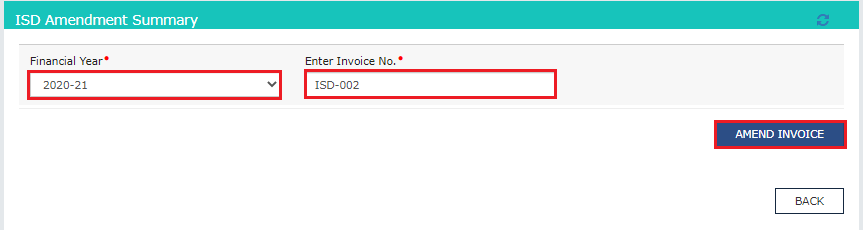
11.1. To enter details of redistribution of ITC available as eligible and ineligible ITC, click the 9 - Redistribution of ITC distributed in earlier returns tile.

11.2. Select the Financial Year from the drop-down list.
11.3. In the Enter Invoice No. field, enter the invoice number/Credit note number which you want to amend.
11.4. Click the AMEND INVOICE button.
11.5. Make amendments to the details as required. Click the SAVE button.

11.6. You will be directed to the previous page and a message is displayed that “Request accepted, subject to validation” successfully.
Note:
a. The status of the amended invoice is Processed.
b. Here, you can also edit/delete the amended invoices (under Actions).
11.7. Click the BACK button.
11.8. You will be directed to the previous page and the 9 - Redistribution of ITC distributed in earlier returns tile will reflect the number of such invoices amended.

12.1. To view details of Total ITC available and Eligible ITC/Ineligible ITC distributed, click the 4 - Total ITC available and Eligible ITC/Ineligible ITC distributed tile.

12.2. Click the CALCULATE ITC button.

12.3. A message is displayed that request has been accepted.

12.4. The Total ITC available for distribution, Amount of Eligible ITC and Amount of ineligible ITC is displayed.
Note: The ITC Details table contains the details from Table 5 & 8. The below (2nd table of the screen shot below) table (Distributed credit reconciliation table) contains details from ITC Details table (1st table of the screen shot below). If credit note is more than the invoice amount in Form GSTR-6, then it will create negative amount in CGST & SGST heads for distribution. However, taxpayer will be able to distribute this amount as IGST, if they have sufficient IGST balance.
For example:-
Credit available in IGST - 5,48,400 INR
Total credit available for distribution – [Sum of IGST=548400, CGST= -18900 & SGST= -18900] = 510600 INR
Total input tax credit available for distribution i.e. 510600 INR only will be bifurcated to the eligible and ineligible credit.
Note: Total credit available (IGST+CGST+SGST) for distribution must be equal to total credit distributed (IGST+CGST+SGST).
12.5. Enter the Utilization of ITC for distribution under major heads. Click SAVE to save the details.

12.6. Click OK.

12.6. will be directed to previous page and the 4 - Total ITC available and Eligible ITC/Ineligible ITC distributed tile in Form GSTR-6 will reflect the total ITC available, eligible ITC and ineligible ITC.

13. Click the PROCEED TO FILE button.

14. A message "Proceed to File is In-Progress. Please check after sometime" is displayed. You can click on refresh button to update the status.

15. Status is changed to Ready to File. Click the PROCEED TO FILE button.

Note: If uploaded invoices are not visible, perform the following steps:
1. Navigate to Table 4 - Total ITC available and Eligible ITC/Ineligible ITC distributed.
2. Click on the Calculate ITC button in the table.
3. Click on the small Refresh button on the right corner in the screen
4. Offset the ITC correctly and click on the Save button.
5. Click on the Back button and go back to the Dashboard.
6. Click on the PROCEED TO FILE button.
7. Click on the small Refresh button on the right corner of your screen.
8. Once the status on the header says - Ready to file, all your invoices will be visible.
Note – Refresh button is required to be clicked twice.


16. Once you have proceeded to file, CONSOLIDATED SUMMARY of the Form GSTR-6 will be available for review. You can scroll down to review summary of the entries made in different sections before submitting Form GSTR-6. Click the PROCEED button.
Note: Click BACK TO GSTR-6 DASHBOARD to edit the details in the Form GSTR-6.

17. After proceeding, Payment of Fee page is displayed. It displays balance available in cash ledger, late fee payable and late fee paid. It also shows if any additional cash is required to pay the late fee.

18. Select the declaration checkbox. Select the authorized signatory from the Authorised Signatory drop-down list. This will enable the FILE RETURN button.

19. Click the FILE RETURN button to proceed filing.19. In case of insufficient balance, “You do not have sufficient cash balance to pay off your liabilities. Kindly add balance by clicking ‘Create Challan’ button and then file the return” message is displayed. Click on CREATE CHALLAN button.

20. The Create Challan page is displayed.
Note: In the Tax Liability Details grid, the Total Challan Amount field and Total Challan Amount (In Words) fields are auto-populated with total amount of payment to be made. You cannot edit the amount.
21. Select the Payment Modes as E-Payment/ Over the Counter/NEFT/RTGS. Click the GENERATE CHALLAN button. The Challan is generated.
Note:
• In case of Net Banking (E-Payment): You will be directed to the Net Banking page of the selected Bank. The payment amount is shown at the Bank’s website. If you want to change the amount, abort the transaction and create a new challan. In case of successful payment, you will be re-directed to the GST Portal where the transaction status will be displayed.
• In case of Over the Counter: Take a printout of the Challan and visit the selected Bank. Pay using Cash/ Cheque/ Demand Draft within the Challan’s validity period. Status of the payment will be updated on the GST Portal after confirmation from the Bank.
• In case of NEFT/ RTGS: Take a printout of the Challan and visit the selected Bank. Mandate form will be generated simultaneously. Pay using Cheque through your account with the selected Bank/ Branch. You can also pay using the account debit facility. The transaction will be processed by the Bank and RBI will confirm the same within <2 hours>. Status of the payment will be updated on the GST Portal after confirmation from the Bank.
Click here to refer the FAQs and User Manual on Making Payment.

22. Once the payment is done, a confirmation message is displayed. Click the YES button.

23. Click the FILE RETURN button to proceed filing.
Note: Click the PREVIEW DRAFT GSTR-6 button to download the draft summary pdf of Form GSTR-6 for your review.


24. A Warning message is displayed. Click YES to proceed.

25. Submit Application page is displayed. Click the FILE WITH DSC or FILE WITH EVC button to file your return.

26. The updated Form GSTR-6 page is displayed. The status of Form GSTR-6 is changed to Filed.
Note:
• On filing of the Form GSTR-6, notification through e-mail and SMS is sent to the Authorised Signatory.
• Click on DOWNLOAD FILED GSTR-6 (PDF) button to download the final return copy to your system.
• Click VIEW SUMMARY button to view consolidated summary of your filed Form GSTR-6.